TH Variation Swatches Plugin will replace default swatches with professionally styled and colourful swatches. For using this plugin first install & activate WooCommerce in your dashboard.
Step 1: Go to your WordPress Dashboard > Wp Admin Plugins > Add New. Then in the search box, enter the name “THVariationSwatches“. A plugin will appear. Then click on the ‘Install Now’ button.
Step 2: After the installation is completed, click on the ‘Activate’ button, and “TH Variation Swatches” will be activated.
Step 3: After activating the “TH Variation Swatches Plugin” in your dashboard, you can see the “ThemeHunk” tab on the right side. Under it you’ll find the TH Variation Swatches tab, click on it. Now you can start customizing it.
How to Purchase & Install Pro Plugin
TH Variation Swatches Pro Plugin comes with more advanced features and replaces default swatches with professionally styled and colorful swatches. For using this plugin first install & activate WooCommerce in your dashboard.
Step 1: Navigate to the ThemeHunk homepage, You will see “Plugins” menus on the top, when you hover over it you’ll see Th Variation swatches, click on them.
It will open Plugins page, search for Variation Swatches Pro and click on the View Details button.
Step 2: Afterward, just simply hit the ‘Buy Now’ button and it will directly take you to the ‘Pricing‘ section of TH Variation Swatches Pro Plugin.
Step 3: Now choose your desired plan from here and hit the button Buy Now from the desired table.
Step 4: Purchase your plugin from here, and fill in all the required details. Login to your member’s area. Your pro plugin has been added to your member’s area dashboard.
Step 5: You’ll see a TH Variation Swatches Pro plugin zip file in your Member’s area. Download the zip file of the plugin.
Step 6: Now, Open your WordPress Dashboard > Plugins > Add New > Upload the Plugin Zip file and Activate it.
You can see the “TH Variation Swatches Pro” panel in your dashboard.
Go with this Video Tutorial and Learn about TH Variation Swatches Plugin.
How to Create Attributes for your product?
Attributes add extra data to your WooCommerce products which will be useful for Searching & Filtering products. Our Plugin comes with three attribute types Color, image & button.
To add Attributes, Go to “Products” and then “Attributes” from your left sidebar menu.
As you’ll see by default, there are no WooCommerce attributes set up in your store.
Now enter the Name of the New Attribute For eg. – “Colors“. Select the Type i.e Color, Image, Or Button Swatches according to your need.
Click “Add attribute” and your attribute will be added.
After Adding an attribute, Now click on Click “Configure terms” in the same row as “Colors“.
In Configure terms enter the “Value” name, slug & description for your attribute.
Note – If you’re Adding Color Attribute then select the desired color from the color bar, given in the panel. If you’re adding an Image then upload an image for that attribute value.
How to Assign Attributes to Product?
Go to WooCommerce > Products.
Click on Add new product > Create a Product, add Product Name, Description, and Featured image, and Assign a Category to it.
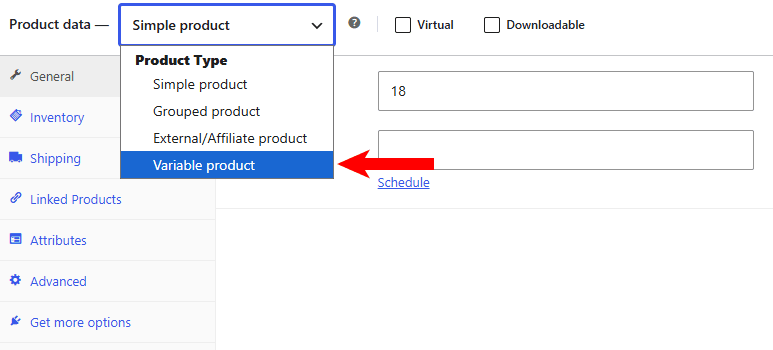
When you scroll down the product page editor, you’ll see the Product Data panel, Select Variable product from the Product Data drop-down.
You can add options in two different ways depending on how your store is set up:
Method A: Adding Global Attributes (Pre-made Options)
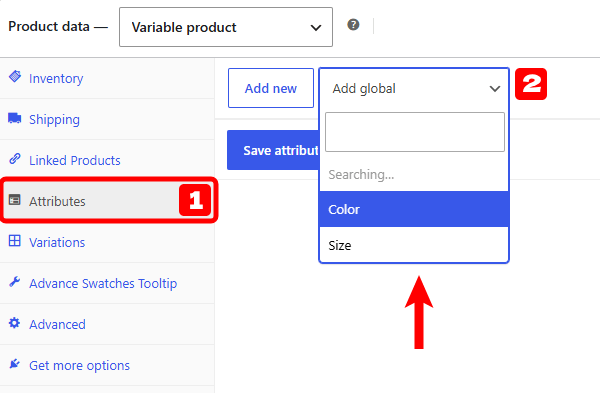
If you already created options under your global website settings, use the Add global dropdown list (marked as 2 in the screenshot):
Click the Add global box to open your dropdown menu.
Select your pre-made choice (like Color or Size).
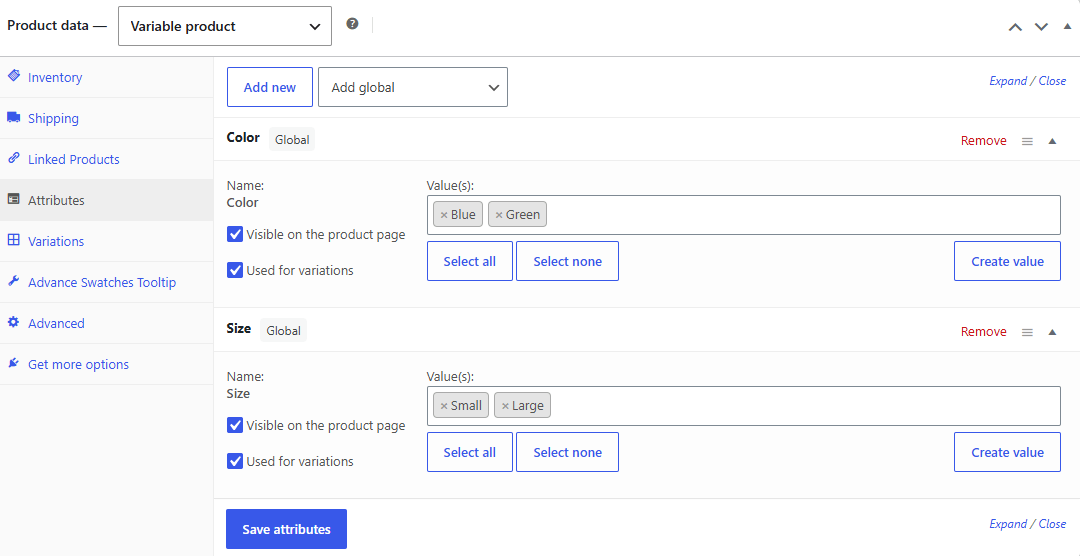
Click the Select all button to quickly pull in your pre-saved choices, or click Create value to type a new choice on the spot (like adding Green to your color options).
Method B: Adding Custom Attributes (Unique to This Product)
If you want to create a brand-new option that is only used for this specific item:
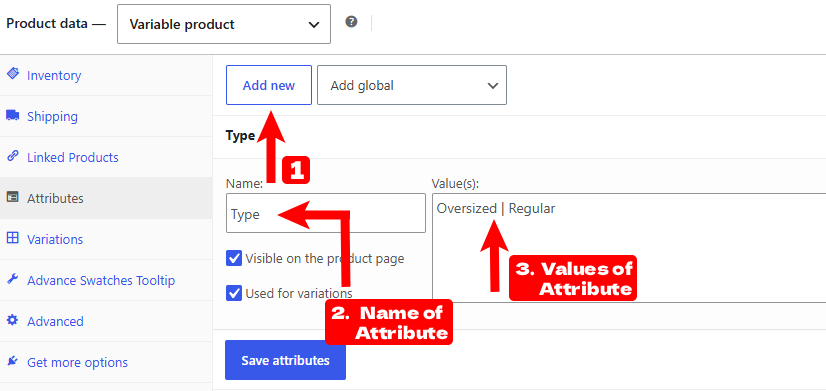
Click the Add new button (marked as 1 in the screenshot).
Go to the Name box and type your option headline (e.g., type Type or Material).
Go to the Value(s) box and type your choices. Separate each choice using a vertical line symbol | on your keyboard (e.g., type Oversized | Regular).
How to Add Variations to Product?
After saving your attributes, the next step is to create the actual product choices (variations) that customers can buy (such as a Blue, Large t-shirt).
Here is a beginner-friendly guide to generating, configuring, and organizing your variations step-by-step.
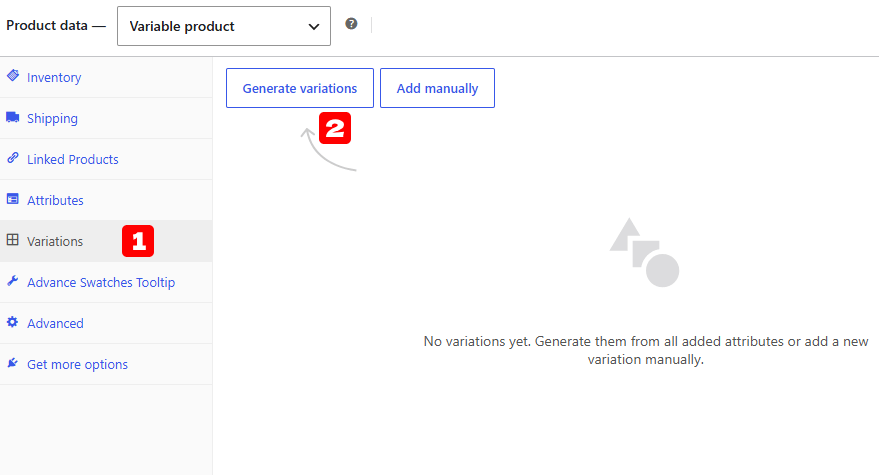
When you first open a variable product, your variation workspace will be completely empty. To create your variations, click the items in this exact order:
Click the Variations Tab (1): Look at the left-hand menu column and click Variations. This opens your configuration workspace.
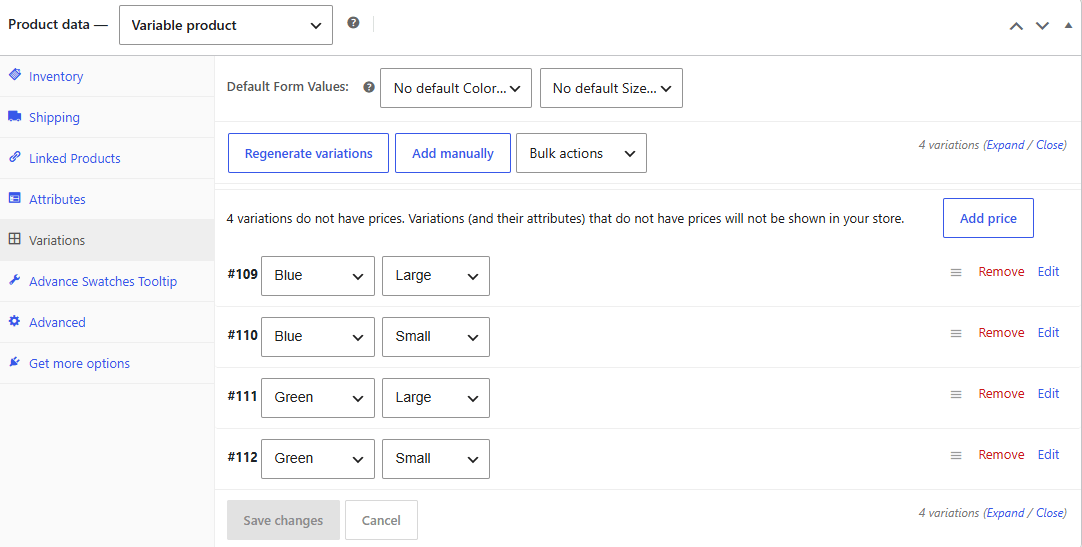
Click Generate Variations (2): Click this button next. The plugin will instantly read all the attributes you saved earlier and automatically combine them to build every possible variation for you (for example, creating Blue Small, Blue Large, Green Small, Green Large).
Once the plugin automatically builds your list of combinations, you must configure them. Crucial Rule: In WooCommerce, any option that does not have a price will be completely hidden from your customers on your live store.
Set Your Pricing: Click the Add price button or use the Bulk actions dropdown menu to quickly apply your regular pricing to your variations all at once.
Customize Individual Options: Click Edit on the far right of any row to add unique images, stock quantities, or custom weights for that specific option. Click Remove to delete any combination you do not actually carry in stock.
Set Your Pre-selected Defaults: Use the Default Form Values dropdown menus at the very top if you want a specific choice (like Blue and Large) to be automatically selected when a buyer visits the page
To create your options manually step-by-step, click the buttons in this exact sequence:
Click the Variations Tab (1): Navigate to the left-hand settings column and click on Variations to open your configuration workspace.
Click Add Manually (2): Next, click the Add manually button. This creates a single blank row, allowing you to build one specific product option combination at a time instead of generating all combinations automatically
Select Attributes: Use the dropdown boxes on each row to assign specific characteristics to that item slot (such as setting specific rows for Green + Large or Blue + Large).
Apply Broad Rules: Selecting Any Color… or Any Size… tells the plugin that this specific row applies to all options in that category. This is perfect for saving time if your items share the exact same price or stock pool.
Save Your Progress: When you are finished configuring your product options, click the blue Save changes button at the bottom left to push your variation swatches live on your storefront
Enable ToolTip Setting
This option will Enable or Disable Toptip from the product attribute Swatches.
Go to Your Dashboard > TH Swatches > Style > Tooltip.
Here you’ll see the Tooltip option, check the box and enable or disable the tooltip from your product attribute Swatches.
Save your changes.
Result of ToolTip –
Change Attribute Shape
Using this option you can change the Shape of your attribute Swatches – Rounded or Squared respectively.
To change the shape of swatches, Go to Your Dashboard > TH Swatches > Style > Attribute Shape Style.
You’ll see the Attribute Shape Style option, on clicking on the radio button you can select the shape of your swatches, Rounded Shape or Squared Shape.
Save your changes.
Result of Rounded Shape –
Result of Squared Shape –
Attribute Display Settings
Go to Your Dashboard > TH Swatches > Advanced Setting.
DISPLAY SETTING
Attribute Title – From the display setting, you can Show the Attribute Title by checking the box.
Attribute variation name – You can also Show the attribute variation name after the title, check the box.
Separator – You can add a Separator between the Name & Title, enter the Separator symbol in the text box.
IMAGE SETTING
Attribute image size – From this option, you can select the desired Image size for your image swatches.
ATTRIBUTE STYLE
Width & Height – From this option, you can add the width & height for your Variation value.
Font Size – Enter the desired font size for your Variation value.
Enable Attribute Behavior – It offers an option to blur or hide the out-of-stock variation to simplify the out-of-stock variation. Enable or disable Blur with a cross, Blur without cross, or Hide Attribute Behavior.
1. Blur with cross – This option will Blur your Attribute with a cross icon which is not available.
2. Blur without cross – This option will Blur your Attribute without the cross icon which is not available.
3. Hide – This option will Hide your Attribute which is not available.
General
Display Setting
This section configures the baseline behavior for your variation attributes.
Clear Attribute Setting: Turn this switch on to let users unselect an active attribute option simply by clicking it again.
Ajax variation threshold: Set the product variation limit to switch loading methods to Ajax for better site speed. Enter a number to control this threshold (the recommended default range is between 30 and 40).
Filter Attribute Widget
This section defines the visual structure of your attributes in sidebar filtering widgets.
Filter Attribute Style: Select how your swatches display in your store sidebar using the three layout cards:
Horizontal Boxes: Displays options in a side-by-side layout box grid.
Vertical List with Text: Arranges choices vertically with a descriptive text label next to each option.
Horizontal Boxes with Labels: Displays side-by-side swatch boxes with individual sub-labels underneath.
Style
Attribute Style
This section controls the baseline shapes, sizes, and behaviors of your option selectors on individual product pages.
Swatches Style In Single Page: This setting changes how options are arranged. You can choose a clean, icon-only grid (ideal for simple color boxes or sizes) or a list layout that displays options horizontally next to clear text labels.
Attribute Shape Style: Choose the overall design shape of your option buttons.
Rounded Shape: Turns your options into modern, smooth circles.
Squared Shape: Turns your options into clean rectangles with sharp corners.
Attribute Title Font Size: Controls how large or small the text labels for your choices appear (e.g., the word “Color” or “Size” above your buttons). You can enter a number in pixels.
Separator: This lets you type a specific text symbol to divide your option label from the choice a user makes. For example, using a colon (:) turns your text layout into Color: Blue.
Unavailable Attribute Behavior: Decide what happens when an item variation runs completely out of stock:
Blur with cross: Keeps the button visible but fades it out with an “X” drawn over it so customers instantly know it is sold out.
Blur without cross: Softly fades out and grays out the button without an overlay symbol.
Hide: Completely removes out-of-stock options from the page layout so customers can only click items available to buy right now.
Width: Controls the physical size of your choice items in pixels. Note: If you choose circular buttons, this option controls their entire size.
Font Size: Adjusts the text size inside your choice items (like the text “S”, “M”, or “L” written inside a sizing button).
Border Color & Border Size: Defines the look of the outer line surrounding each choice box. You can pick a custom border color and adjust the line thickness in pixels.
Text & Background Color: Lets you pick a custom color for the characters inside your buttons, along with a filling color for the background area of the option card.
Auto Dropdowns to Button: Turning this toggle switch on takes your store’s old, standard drop-down scroll lists and transforms them into modern, clickable button blocks automatically.
Hover & Selected Attribute Style
This group lets you choose custom colors that display only when a customer places their mouse cursor over an option box, or clicks on a specific choice. You can customize unique color changes for the Border Color, Text Color, and Background Color to make active selections visually obvious.
Tooltip
Tooltips are helpful little popup text boxes that appear right above an option box when a customer points their mouse cursor at it.
Background & Text Color: Customize the internal fill color and text font color of the small popup description box so it stands out against your site theme background.
Tooltip Toggle: Turn this switch on to enable helpful hover-text or miniature image boxes for your product items.
Border Color: Sets a clean outline frame color for image-based tooltip popups to cleanly separate them from the rest of your page.
How To Create Multi / Dual Color Swatches ( Pro version )
To create Dual color/Multicolor, first, navigate to Products >> Attributes. Fill the Name field with your desired product attribute name. Select the Color attribute type from the type dropdown.
Now, we’ll create Red&Blue and Green&Black variations for the DualColor attribute.
Creating Attribute Variation is the same as creating Attribute itself. Fill the Name field with desired variation name. Pick your desired Primary color and select Yes from is Dual Color option. Afterward, the Secondary Color option comes up. pick the secondary color from the color picker.
Enable WooCommerce Dual Color Swatches On Variable Products
To create a variable product, Go to Products > Add new. Give a name to your variable product and add some product descriptions. Make sure you have a variable product selected from the Product Data option.
Select the DualColor attribute, press Add button. After Adding Dual Swatches, you can see the following screen. From here, you add all your attribute variations at once, by pressing the Select All button. Select Dual Color Black/Red for the DualColor attribute as shown in the below image.
Click Add Variation dropdown. You can see Create variations from all attributes option comes up. Select the option and press the Go button. Now in your variation, you can select the Black/red for any desired variation which you have created in your attribute.
Tooltip Image Setting ( Pro version )
If you want to insert an image tooltip image-based product basis variation. Go to TH Swatches Pro > Special > Tooltip option.
You can set the Image tooltip image from Product > Product Data > Product Variation settings. The image which will upload here will be shown in your product Tooltip.
Enable Image Tooltip – Enable or disable the Tooltip from your product variation.
Select Tooltip Attribute – Select the attribute from the drop-down box, in which you want to show the image tooltip.
Width – You can adjust the width of your tooltip image, it will maintain the ratio of 1:1.
Result of Tooltip Image –
Product Catalog Setting ( Pro version )
Core Display Toggles
Enable Swatches: Turn this toggle on to display your clickable color, image, or text swatches under product cards on your main shop and category archive pages.
Enable Single Swatches: Turn this switch on to separate your variations into individual product listings on your shop page. This operates your archive like a “catalog mode” where each option looks like its own standalone item.
Enable Variation Slider: Switch this toggle on to pack your swatches inside a swipeable carousel slider. This is perfect for keeping your shop layout clean if a product has a large list of options.
Enable Clear Link: Turn this switch on to add a quick “Clear” link next to the swatches on your catalog page, letting customers instantly reset their active selections.
Layout & Sizing Control
Swatches Alignment: Select how your swatches sit under your product information using the dropdown menu (e.g., Left, Center, or Right).
Width: Input a specific number value in pixels to scale the size of your swatch buttons. Note: If you use circular options, their entire size is managed by this width field alone.
Font Size: Type a custom value in pixels (e.g., 14px) to increase or decrease the text sizing inside your option blocks.
This feature displays a miniature product image popup when customers place their mouse cursor over a variation button on individual product pages.
Enable Image Tooltip: Turn this toggle switch on to activate visual image popups when customers hover over variations on a single product page.
Select Tooltip Attribute: Use this dropdown menu to choose exactly which product option (like color or size) triggers the image popup when hovered.
Width: Type a custom number value in pixels to change how large the image popup looks. Note: The system automatically locks the popup container to a perfectly square 1:1 shape ratio.
This feature displays a miniature product image popup when customers place their mouse cursor over a variation button on individual product pages.
Enable Stock: Turn this toggle switch on to display clear inventory availability labels directly on individual product pages.
Stock Threshold: Type a specific number value here to control when the low-stock warning triggers. The system will hide the inventory count until the stock drops to or below this exact number.
Result of Product Catalog –
Highlight Attribute Setting ( Pro version )
Your product may have plenty of attributes. If you want to keep your desired single attribute stand and highlighted. you can make the attribute enlarged using this setting. Go to your Dashboard > TH Swatches Pro > Special > Highlight attribute.
Enable Highlight – Check the box and make your attribute large in size.
Select Highlight Attribute – Select the attribute from the drop-down box, which you want to Highlight in your product single page.
Width, Height, Font Size – You can add the width, height, and text font size of your attribute variation.
How to manage Stock? ( Pro version )
With the Stock setting, you can show all the remaining stock for variation. For selling any products with multiple attribute variations like color and size, it is necessary to show the remaining product variation. It will create an urge in your customer to purchase a specifically limited variation as soon as possible.
First, do the following setting To add Stock quantity in your Variable Product.
Go to your Dashboard > Products > Add New Product or Click on the edit of your existing product.
Select Variable product from the Product Data dropdown. Now select your Attributes, and Enable the Used for variations checkbox.
Go to the Variations section in the Product Data meta box. Select attributes for your variation and change additional data.
In the additional data box, you’ll see the Manage Stock option, check the box. It will enable the options Stock quantity & Low stock threshold. Add your stock values here.
Note – Using the above Stock setting you can add the stock value of a particular Variation which you want to display on your Product pages.
Now navigate to your Dashboard > TH Swatches Pro > Special > Stock.
Enable Stock – Check the box and Show Stock availability on the Product single page.
Stock threshold – From this option, you can enter the Stock threshold value, whenever the stock reaches this value it will show the left-out stock for that particular variation.
Filter Attribute Widget Layouts ( Pro version )
To show attribute variation in your widget area of the Shop page or other pages, first, navigate to Appearance > widgets > in the widget panel you’ll see Filter Product by Attribute Box.
Drag & Drop this box to your WooCommerce sidebar or footer area. Now you can choose the desired attribute which you want to display and save it.
For Filter Attribute Style layouts, Go to your Dashboard > TH Swatches Pro > Special > Filter Attribute Widget.
There are three different Layouts given for your Widget Product filter Attribute. You can choose any desired layout and change the styling of your widget filter attribute.
Product Basis Swatches Customization (Advanced) ( Pro version )
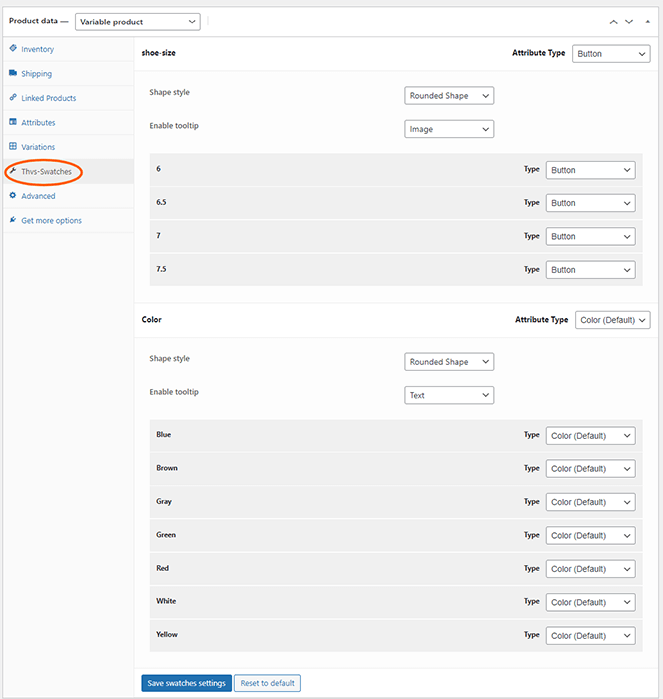
To customize product basis swatches, Go to Product data > Variable product > Thvs-swatches Settings. From there you can start customizing swatches.
Get Help
If you face any difficulties, feel free to contact our support team at the support forum.
You can also Contact us. by filling out the form or ping us at our Live chat for pre-sales queries.
We use cookies on our website to give you the most relevant experience by remembering your preferences and repeat visits. By clicking “Accept”, you consent to the use of ALL the cookies.
This website uses cookies to improve your experience while you navigate through the website. Out of these, the cookies that are categorized as necessary are stored on your browser as they are essential for the working of basic functionalities of the website. We also use third-party cookies that help us analyze and understand how you use this website. These cookies will be stored in your browser only with your consent. You also have the option to opt-out of these cookies. But opting out of some of these cookies may affect your browsing experience.
Necessary cookies are absolutely essential for the website to function properly. This category only includes cookies that ensures basic functionalities and security features of the website. These cookies do not store any personal information.
Any cookies that may not be particularly necessary for the website to function and is used specifically to collect user personal data via analytics, ads, other embedded contents are termed as non-necessary cookies. It is mandatory to procure user consent prior to running these cookies on your website.