Th All in One Woo Cart Plugin is a perfect choice to display Cart on your website and improve your potential customer’s buying experience.
Step 1: Go to your Wp Dashboard > Plugins > Add New. Then in the search box, enter the name “Th All in One Woo Cart”. Plugin will appear. Then click on the ‘Install Now’ button.
Step 2: After the installation is completed, click on the ‘Activate’ button and “Th All in One Woo Cart” will be activated.
Step 3: After activating “Th All in One Woo Cart” in your dashboard, you can see the “Themehunk” tab on the right side. Under it you’ll find Th AIO Woo Cart tab, click on it. Now you can start customizing it.
Step 1: Navigate to the ThemeHunk homepage, You will see “Plugins” menus on the top, click on it. On this page you’ll see TH All in One Woo Cart Pro, click on the view details button.
Step 2: You’ll now navigate to the Plugin page. Afterward, just simply hit the ‘Buy Premium’ button and it will directly take you to the ‘Pricing‘ section of Th All in One Woo Cart Pro Plugin.
Step 3: Now choose your desired plan from here and hit the button Buy Now from the desired table.
Step 4 : Purchase your plugin from here, fill all the required details. Login to your member’s area. Your pro plugin has been added in your member’s area dashboard.
Step 5 : You’ll see a Th All in One Woo Cart Pro plugin zip file in your Member’s area. Download the zip file of the plugin.
Step 6 : Now, Open your WP Dashboard > Plugins > Add Plugin > Upload the Plugin Zip file and Activate it.
You can See “Th All in One Woo Cart Pro” panel in your dashboard.
To activate your plugin, you need to enter a license key that will activate your Pro plugin. Let’s see how you can activate your
Click on Find Your License Key below the box.
You will need to log in with the credentials that you used while purchasing the plugin. Copy the License Key from the next page.
Come back to the Cart dashboard, paste the license key, and click on Activate.
How to Integrate Cart into your Theme?
Add Cart in Header Menu (Pro)
Go to Appearance -> Menus > Add TH All In One Woo Cart as a menu item and save the changes. This will display the Cart icon in your header menus.
Select Cart > Add to Menu > Save Menu
This will come to the menu
Using Shortcode
[taiowc]
You can easily add Th All in One Woo Cart to your website with a shortcode. You can use a Shortcode block, Widget, or any page builder shortcode add-on to display the cart.
Using PHP
<?php echo do_shortcode('[taiowc]'); ?>
You can add a Cart using PHP.
Add this PHP code at the desired location in any PHP file
General Setting
Go to Th All in one Woo Cart > General setting. In this panel, you’re allowed to change the setting of your shopping cart.
How to Add Floating and Fixed cart?
Go to Th All in one Woo Cart > General > Enable Cart.
Enable Cart – Using this option, you can enable or disable Floating and Fixed carts from your site. The floating cart and Fixed cart are quick panels that will give shoppers a simple way to check out with a click.
Cart Open With – Here, two styles are given. When Auto Open with Ajax is selected, the cart will open automatically when a product is added to the cart. When Auto Open with Image fly Effect is selected, the product will be added with a fly effect that will take place from the product to the Cart.
Choose Cart Icon – Various cart icons are given that you can select for your site. You can also upload a custom icon if you have.
If you disable the floating cart on your site, the cart at the bottom will be disabled.
Menu Cart
Menu Cart Configuration – Buttons are given to control whether you want to show Price and Quantity or not.
Sizing & Layout – You can separately control the size of Price font and Icon. Size is followed by px.
Color Palette – Various color palettes are given for each component of the Cart.
While doing all these changes, you can see the live preview at the right side.
Fixed Cart
This section is given to customize the Fixed cart only.
Fixed Cart Configuration – You can select the style of the fixed cart; there are two styles to show.
Show Quantity – You can choose whether you want to show quantity or not.
Position – Select where you want to show the fixed cart, left or right.
Style Properties – The size of the Icon and Border radius can be set from here.
Color Palette– Color options for various things like background, icon, text, etc.
All changes will appear in the right section.
Cart Side Panel
Cart Side Panel settings ensures how your cart panel would appear when user would interact with it.
From icon to styles and order, you can set how it would appear to users.
So many things are here to customize, you can control the tiny details. This include Cart Header Area, Cart Content Area, Cart Panel order Area, Cart Panel May you like Style, Coupon Style, and Cart Panel Notification.
Shipping Bar Style
You can set up a visual progress bar to encourage customers to add more items to their cart to qualify for free shipping.
Shipping Bar (Free): This option displays a simple, single-goal tracker showing exactly how much more money a customer needs to spend to unlock free delivery.
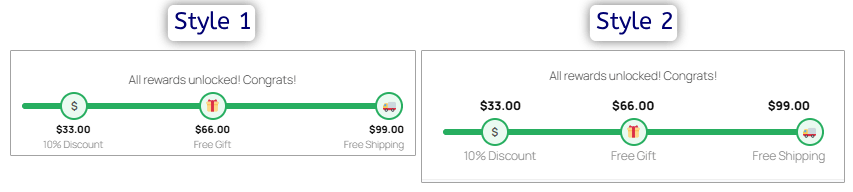
Milestone Bar: This option lets you set up multiple spending targets along a single progress line, allowing customers to unlock increasingly better rewards as their cart total grows.
Below is the preview of Shipping Bar (1st image) and Milestone Bar (2nd image)
Under the Bar Style dropdown menu, you can change the visual look of the progress tracker to match your storefront theme:
Default: A clean and standard progress design that blends in with most classic shopping websites.
Progressing Bar: A modern tracking line that clearly fills up with color as items are added to the cart.
Neon Bar: A bright, glowing design style intended to stand out and grab your customer’s immediate attention.
Premium: A polished, high-end visual design theme tailored for sleek and professional online stores
Note: Styles other than Default are available in the Pro plugin only.
How to set up Shipping
Step 1: Open WordPress Dashboard and go to Woocommerce > Settings > Shipping > Add Zone
Step 2: Set the Zone name and Zone regions
Set Your Zone Details
Zone name: Type a clear name for your shipping region to help you identify it in your dashboard, such as “Local” or “Worldwide”.
Zone regions: Click inside the text box and select the specific continents, countries, or states you want to include in this shipping area.
Limit to specific ZIP/postcodes: Click this blue text link to type in precise postal codes if you want to narrow the shipping zone down to exact local neighborhoods instead of an entire region.
Step 2: Click on Add Shipping Method
Create the Shipping Method and make sure to choose Free shipping and click on the blue Continue button to move to the next setup panel.
Next, configure Free Shipping Rules
Name: Type the title your customers will see during checkout, such as “Free shipping”.
Free shipping requires: Click this dropdown menu to select the rules needed to trigger free delivery:
No requirement: Offers free shipping to all customers in this zone automatically.
A valid free shipping coupon: Requires the customer to enter a specific promotional code at checkout.
A minimum order amount: Requires the customer’s cart total to reach a specific dollar value.
A minimum order amount OR coupon: Triggers free shipping if the customer either spends the minimum amount or enters a valid code.
A minimum order amount AND coupon: Requires the customer to both meet the minimum spending limit and enter a valid code.
Set the rule and click on Create and save.
As a demonstration, I am setting Free shipping requirements as A minimum order amount.
This is how it will look after setting up.
Milestone Bar
When you select Milestone Bar, a detailed configuration area opens up. This allows you to set up to three unique spending goals that reward customers with discounts, free gifts, or free shipping as their cart total grows.
Milestore Bar Style
Two styles are available for Milestone Bar.
Milestone Bar Settings
The milestone bar settings allow you to display an interactive multi-tier progress track inside the customer’s cart, showing some distinct spending goals. With these configurations, you can display custom milestone reward text when all targets are met and choose a visual layout design using the style dropdown.
Milestone Type 1: You can use the tier to offer an easy initial reward, as I gave a percentage discount on their current order. You can use any discount percentage you want, I set 10% for demonstration.
When a customer adds enough items to reach this set dollar amount, the plugin automatically applies the discount percentage to their cart total. This gives them an immediate reward and motivates them to keep shopping toward the next goal.
Milestone Type 2: The second tier is perfect for offering a tangible reward, like an automatic free gift. By entering a specific product identification number into the settings, that exact item will automatically appear in the customer’s cart for free the moment their spending crosses this second threshold. This adds high perceived value to their shopping experience without requiring coupon codes.
If you select the 2nd milestone as a free gift, you will need to add the product ID of the product you want to give as a gift. In the image below, I have added a product of ID 23, which is a pair of Sunglasses.
Milestone Type 3: This milestone represents the highest spending goal on the progress track. You can use this milestone to unlock your best offer, such as free shipping or a premium bonus item. Once the customer’s cart total hits this final amount, the custom unlock text appears at the top of the cart to celebrate their achievement and confirm that all rewards have been successfully earned.
Note: Free shipping works when a shipping fee is added on site.
In the first image, the customer has a subtotal of $70.00. This amount successfully unlocks the first two milestones, automatically adding a free pair of sunglasses to the cart and applying a 10% discount. However, the progress bar stops short, showing the customer is still $29.00 away from unlocking free shipping.
In the second image, the cart subtotal rises to $105.00 after adding a premium hoodie. Because this amount clears the final $99.00 target, milestone three is achieved. The progress bar fills completely, the top text celebrates the achievement, and the shipping fee changes from $30.00 to completely free.
Content Visibility
Product List
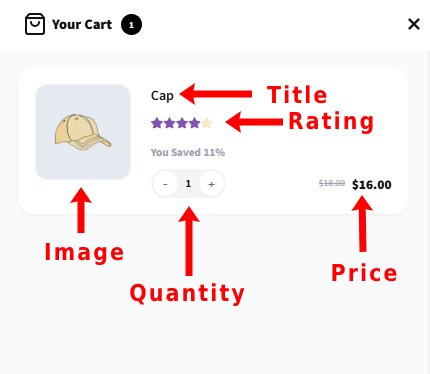
The Content Visibility settings allow you to choose exactly what information your customers see inside the shopping cart panel.
Product Image: Switch this on to show a picture of the item next to its name, or turn it off to hide the image and make the list text-only. Product Title: Keep this enabled so customers can read the exact name of the item they added, or disable it to remove the text name from the cart. Product Price: Toggle this on to show customers the cost of each item directly inside the cart panel, or turn it off to hide all individual item pricing. Product Quantity: Turn this on to display how many copies of an item are in the cart, or turn it off to hide the item counter completely. Product Rating: Enable this to display the item’s star reviews and popularity scores in the cart, or turn it off for a cleaner and simpler appearance.
Products You May Also Like (Pro)
This section helps you recommend extra items to your customers directly inside the shopping cart panel.
Note:- These settings are enabled by default in the free plugin, but you must upgrade to the Pro plugin to disable them or change the text.
Enable: Turn this switch on to show a product recommendation section below the shopping cart list, or turn it off to hide it completely.
Heading: Type your custom text here to change the title that customers see above the recommended products list.
Choose Product: Select where your recommended items come from by choosing an option like Cross Sell, Up Sell, Related, or Custom Products.
Cross Sell: Shows items that complement or go well with what is currently in the cart.
Up Sell: Displays more expensive or upgraded versions of the items in the cart.
Related: Automatically selects similar products based on the category or tags of the current items.
Your Products: Lets you display hand-picked specific items that you choose using the Product Slug field below.
Product Slug: Type specific item short-names here, separated by commas if you want to display exact, hand-picked custom products
Payment Settings (Pro)
This section allows you to customize the labels and breakdown of costs that customers see at the bottom of the cart panel.
Note:- These settings are enabled by default in the free plugin, but you must upgrade to the Pro plugin to disable them or change the text.
Payment Heading: Type your custom text here to change the main title shown above the pricing breakdown.
Sub Total Text: Enter the custom wording you want to use for the cost of items before shipping and discounts are calculated.
Show Shipping: Turn this switch on to display the shipping cost in the cart panel, or turn it off to hide it.
Show Discount: Turn this switch on to let customers see the money saved from applied coupons or sales, or turn it off to hide discount lines.
Discount Text: Type the custom text label you want to use to describe price cuts or coupon savings.
Total Text: Enter the custom wording you want to use for the final, absolute amount the customer needs to pay.
Coupon Settings (Pro)
This section allows you to manage how promo codes and discount offers look and work inside the cart panel.
Note:- These settings are enabled by default in the free plugin, but you must upgrade to the Pro plugin to disable them or change the text.
Show Coupon: Switch this on to add a coupon entry box to the cart panel, or turn it off to hide the option entirely.
Placeholder Text: Type the temporary hint text that customers see inside the empty coupon box before they type their code.
Apply Coupon Button Text: Enter the custom text you want to display on the action button that customers click to submit their code.
Show Coupon List: Turn this switch on to let customers view a list of available deals directly in the cart, or turn it off to hide it.
View Coupon Link Text: Type the custom wording for the clickable text link that customers use to open your available deals list.
Show Added Coupon: Keep this enabled to show a list of promo codes that have already been successfully applied to the current order.
Footer Text
This section lets you add custom branding, credits, or informational links to the very bottom of your cart panel.
Note:- These settings are enabled by default in the free plugin, but you must upgrade to the Pro plugin to disable them or change the text.
Show Footer Text: Switch this on to display a small line of text at the very bottom of the cart panel, or turn it off to keep it hidden.
Footer Text: Type the custom words or company name you want customers to read in the bottom space of the cart.
Link: Paste the full web address here to turn your footer text into a clickable link that takes customers to a specific webpage.
Visibility Rules
The Page Exclusion List settings let you choose specific pages on your website where you do not want the floating cart widget to appear.
Hide on Cart Page: Turn this switch on to stop the floating cart from showing up when a customer is already looking at their main cart summary page.
Hide on Checkout Page: Enable this option to turn off the cart widget during the final checkout steps to minimize distractions and help customers focus on finishing their purchase.
Hide on Shop Page: Toggle this on to completely remove the cart widget from your main shop directory and product catalog pages.
Hide on Account Page: Switch this on to take the cart widget away from the customer dashboard and account management screens.
Hide on Single Product Page: Activate this setting to hide the cart widget specifically when a customer is viewing an individual item’s main detail page.
Hide on Home Page: Turn this on to keep your main website landing page clean by hiding the cart widget on your main root domain page.
Hide on Blog Feed: Enable this switch to ensure the cart widget does not distract users while they are reading your articles or news updates.
Hide Cart from Pages (Pro): Use this field to manually type or choose extra, specific pages where you want to block the cart widget from showing up.
Mobile Experience
This setting controls the Mobile Cart.
You can enable or disable the Menu and Fixed cart for mobile devices. There are many more settings are given.
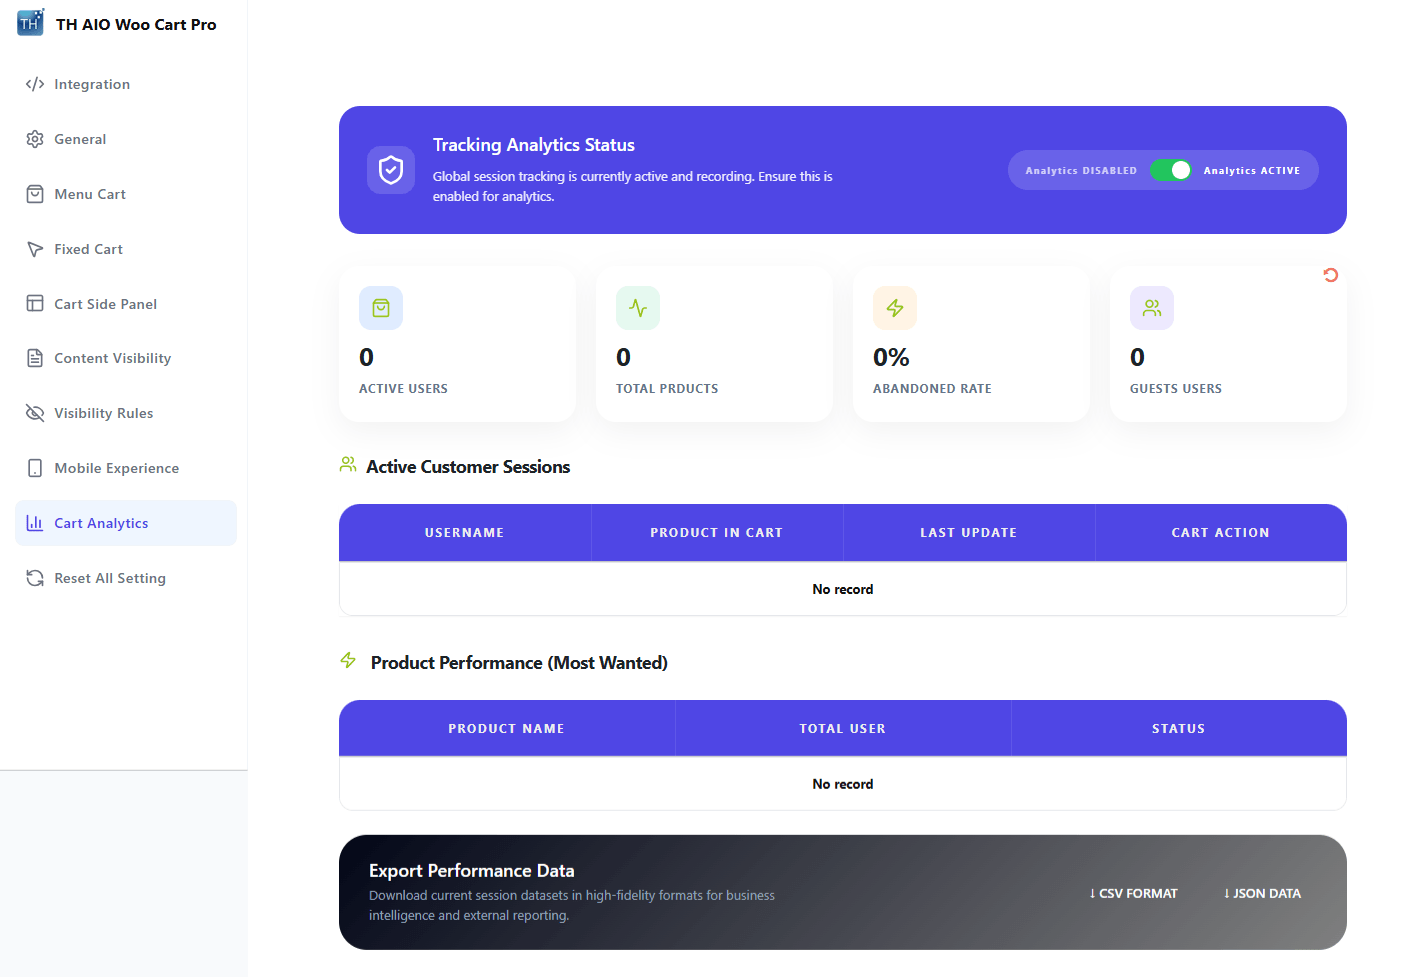
Cart Analytics
The Analytics data helps you creating a good strategy. It gives you data about customers that you can utilize.
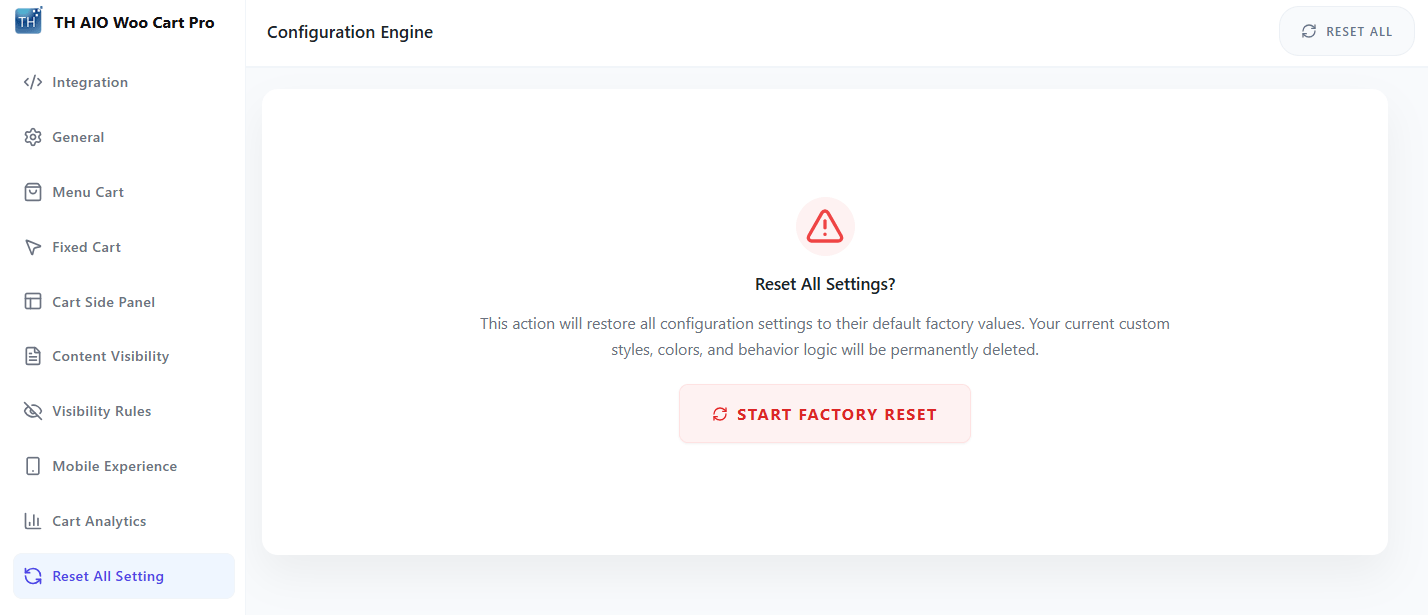
Reset All Setting
This get your plugin settings to factory settings. All your changes will be reseted.
We use cookies on our website to give you the most relevant experience by remembering your preferences and repeat visits. By clicking “Accept”, you consent to the use of ALL the cookies.
This website uses cookies to improve your experience while you navigate through the website. Out of these, the cookies that are categorized as necessary are stored on your browser as they are essential for the working of basic functionalities of the website. We also use third-party cookies that help us analyze and understand how you use this website. These cookies will be stored in your browser only with your consent. You also have the option to opt-out of these cookies. But opting out of some of these cookies may affect your browsing experience.
Necessary cookies are absolutely essential for the website to function properly. This category only includes cookies that ensures basic functionalities and security features of the website. These cookies do not store any personal information.
Any cookies that may not be particularly necessary for the website to function and is used specifically to collect user personal data via analytics, ads, other embedded contents are termed as non-necessary cookies. It is mandatory to procure user consent prior to running these cookies on your website.