Lead Form Builder Pro

Installing the plugin via WordPress Dashboard:-

Constructor de Formularios de Captación

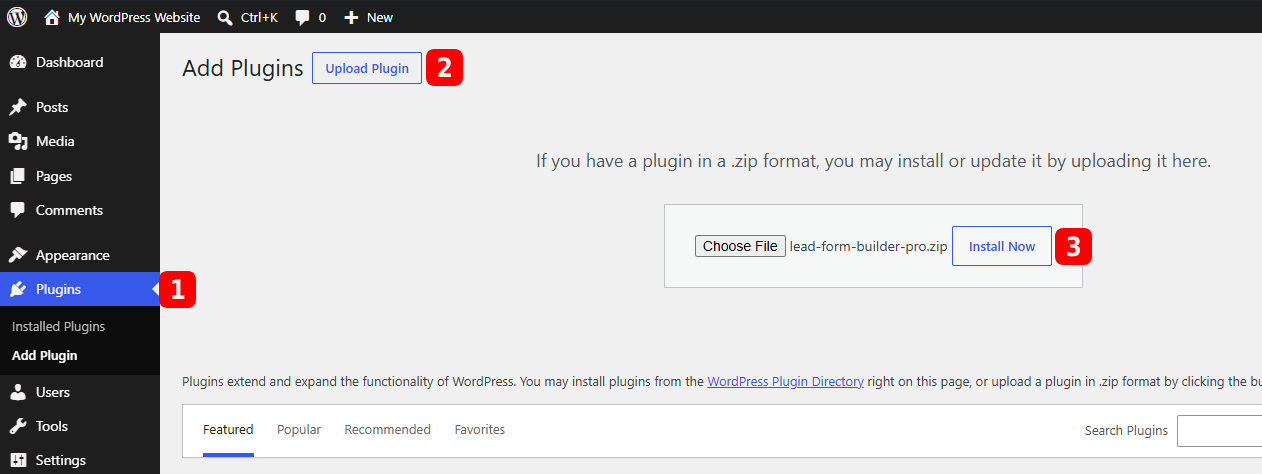
As you already know about our free WordPress plugin Lead form builder lite, Now we are going to give you our pro plugin of Lead form Builder with many advanced features. This doc will help you in running our pro plugin easily for your WordPress site.

  • Step 1 : Navigate to ThemeHunk homepage, You will see “Plugins” menus on the top, when you hover over it you’ll see Pro Plugins, click on it.
  • Step 2 : Afterward, just simply hit the ‘Get Started’ button and it will directly take you to the ‘Pricing‘ section of Lead Form Builder Pro Plugin.
  • Step 3: Now choose your desired plan from here and hit the button Buy Now from desired table.
  • Step 4: Purchase your plugin from here, and fill in all the required details. Log in to your member’s area. Your pro plugin has been added to your member’s area dashboard.
  • Step 5 : You’ll see a Lead Form Builder Pro plugin zip file in your Member’s area. Download the zip file of plugin.
Lead-Form-Builder-Pro-installation-5
  • Step 6 : Now, Open your WP Dashboard > Plugins > Add New > Upload the Plugin Zip file and Activate it.
  • You can see the “Lead Form Builder Pro” panel in your dashboard.

Creating Form :-

  • For creating a new form just go to “WP dashboard > ThemeHunk > Lead Form > Add Form”.
  • When you click on Add form, a new panel will open where you will see Form Fields like –

First, give your Form a title, and then in the box below, write the names of the fields that you want to create. Having written the names of all fields, click Generate Fields.

Your fields will be generated, and then you can set whether you want to keep the placeholder and required. If you still want to add a field, click on Add Field and then enter the values.

Another Method to add a field

You can add fields manually also if you want.

1. Add Field Name – Enter the field name of your form here.
2. Field Type – You can choose the field type from here. There are many field types given. You can choose them according to your needs.
3. Default Value – You can enter the default value of your field name.
4. Use Default Value as a Placeholder – Check this option to show default value inside fields.
5. Required – Check this option to make that particular field mandatory/required.
6. Submit Button – You can add or edit the submit button text.
7. Action ( Add or Remove ) – This button will help you in adding more fields. You can also Remove your fields.

  • Choose desired fields and create form for your website.
  • You can also choose the Drag and Drop field ordering : To order form fields just drag and drop fields.
  • After creating your form, don’t forget to Save it.
  • To display form in your site, you can use the shortcode which will generate in your form.


FYI – Add “Terms and Condition check box” from the field type option. You can put your Terms of services in field name and set it as required.
For example – Put the text <a href="#">Term & condition</a> in field name, this will show text with link too. ( Write link in place of #. )

Pre-Built Templates

You can save your time by importing the pre-built templates. There are several templates for you, and these are below-

  • Contáctenos
  • Feedback Form
  • Registration Form
  • Email Subscription
  • Job Application Form

Adding them is Easy. Simply go to Pre-built Form. Choose any one template and click on its Import Template button.

Displaying Form:-

Display Lead form Using Block

You can add your forms directly into any post or page using the WordPress block editor. This allows you to place a form exactly where you want it and configure it immediately.

Step 1: Add the Lead Form Builder Block

  1. Open the page or post where you want to add the form.
  2. Click the + (Block Inserter) icon in the top left corner of the editor.
  3. Type Lead Form Builder into the search bar.
  4. Click on the Lead Form Builder block, or drag and drop it into your page content.

Step 2: Select Your Form

  1. Click on the newly added form block to select it.
  2. Look at the Block settings panel on the right sidebar.
  3. Find the dropdown menu labeled SELECT LEAD FORM.
  4. Click the dropdown and choose the specific form you want to display.

Step 3: Customize From the Right Sidebar

  1. Ensure the block is selected so the settings remain visible on the right.
  2. To change the form layout, fields, or styling, click the Customize Lead Form button in the sidebar.
  3. To add custom CSS classes for advanced styling, click the Advanced dropdown menu at the bottom of the sidebar.

Display Lead form Using Shortcode

  • You can display the Contact form in your Site pages by just adding the shortcode.
  • To Get Shortcode, first create a form – “WP dashboard > ThemeHunk > Lead Form > Add Form”. After creating form under Form list, you’ll see Shortcode field. Copy Shortcode from there.
  • Now Navigate to your Page/Post editor area and Paste Shortcode there. This will display form on your page/post area.

This is preview

Display Lead form using Elementor

Our new Lead Form Styler is now available for Elementor.

You can follow these steps to style the form with Elementor.

  • First, install and activate the Elementor plugin in your WordPress dashboard. Now, now Go to any page/post of your choice to edit that page/post using Elementor.
  • When the page/post is opened in Elementor, search for Lead Form Styler.
  • Drag and Drop the widget and you will see the list of already created forms there. You can select the form and customize it as per your need.

View Leads through Form

  • There are two ways to view leads. If you want to view all leads, click on the View leads button of you plugin’s dashboard.
  • This option will display your form leads in your dashboard. If someone filled your form, Leads will automatically save in your dashboard with all the details.
  • To see the collected leads of a particular form, click on the number of leads of that form.

Following options are available in this panel –

  • Name, Email, and Message: Shows the exact text entered by the user.
  • IP Address: Displays the network identification number of the user’s device.
  • Lead URL: Provides the specific link to the webpage where the form submission took place.
  • Date: Shows the precise day the form entry was submitted.

Form Customization

  • For Form Color Customization. Go to Dashboard > Lead form
  • Click on the Color icon of the form you want to edit:-

It will this page to customize the Contact Form.

Use the right sidebar panel to adjust layout dimensions, styling borders, custom backgrounds, fields, and submit buttons across expandable sections. Paste advanced custom CSS overrides if needed, or reset the style entirely, then click Save Changes to instantly apply updates.

  • Form Settings: Adjust overall form width, border width, styles, colors, corner radius, and outer box shadows.
  • Header Settings: Manage the appearance, text typography, alignment, and spacing of your form title.
  • Background: Select a custom background color or upload an image fill for the form container.
  • Field Settings: Customize the sizing, fonts, colors, and styling of individual form input boxes.
  • Submit Button: Change the dimensions, text alignment, background color, and font style of the submit control.
  • Custom CSS: Paste advanced code snippets to apply unique, custom visual overrides to your layout.
  • Reset Styles: Wipe out all customized design modifications to restore the form back to its default appearance.

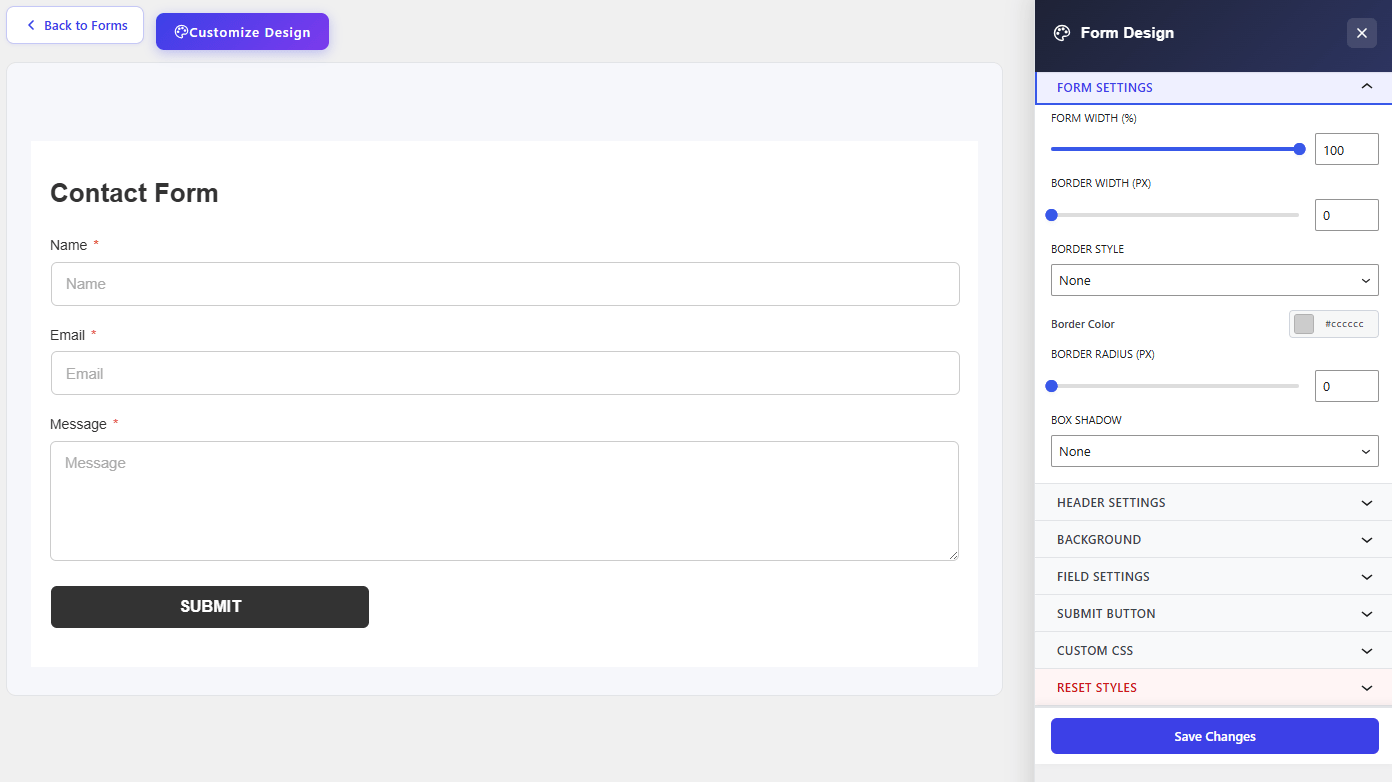
Below is the visual representation of the customization.

How to Edit or Update Form :-

  • Go to Lead Forms Builder Pro > Form List.

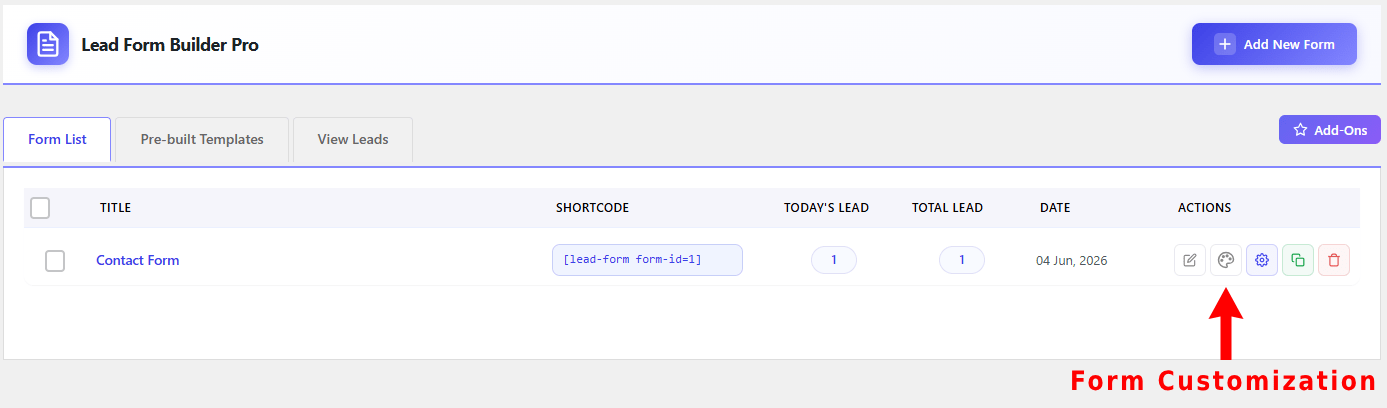
You can use either of these two simple methods to open the editing page:

  • Method A (Using Actions): Move your mouse to the Actions column on the far right. Click the first icon (the Edit Form button).
  • Method B (Using the Title): Click on the name of your form.

Both actions will take you to the exact same form editing page where you can change fields, layouts, and settings.

Form Setting :-

  • For Form Setting. Go to Dashboard > Lead form > Form list > Form Settings.
  • You’ll get Following Form Settings with Pro version –

Captcha Setting

Go to Spam Protection tab.

    How to Add Captcha?

    • Go to Google reCaptcha > Admin Console > Register your account and select the version Google reCaptcha v3 or Google reCaptcha v2.
    • To add Captcha in your form you have to Generate a site key and secret key by going with the settings.
    • Copy the Site key and Secret key, paste it in the dashboard. Now your google recaptcha will perfectly work on your site.
    reCAPTCHA-v3-lead-form-builder

    Google reCaptcha v3

    • Captcha Version – You can choose the captcha version – Google recaptcha v3 Or Google recaptcha v2.
    • Google reCaptcha v3 -It will continuously monitors the visitor’s behavior to determine whether it’s a human or a bot. After that that you now need to decide which action to take depending on the score.
    • To add Google reCaptcha v3, First Generate the Site Key & Secret key from the Google reCaptcha. Now Go to Dashboard > Lead Form > Captcha Settings > Setup Captcha > Captcha Version > Select Google reCaptcha v3 and Enter the Site Key & Secret Key. Save It.
    v3-reCAPTCHA

    Google reCaptcha v2

    • Google reCaptcha v2 – Here it will verify whether the user correctly solved the challenge or not.
    • To add Google reCaptcha v2, First Generate the Site Key & Secret key from the Google reCaptcha. Now Go to Dashboard > Lead Form > Captcha Settings > Setup Captcha > Captcha Version > Select Google reCaptcha v2 and Enter the Site Key & Secret Key. Save It.
    reCAPTCHA-v2-lead-from-builder

    Form Settings

    Lead Receiving Method

    • Go to Dashboard > Lead form > Click on Settings Icon

    • The form contains three lead receiving options Receive leads in email, Save leads in database (You can see all leads in the view leads), Receive leads in email and save in database.
    Receive leads in an email:- You can receive your leads in your mail which you have set in the email setting.

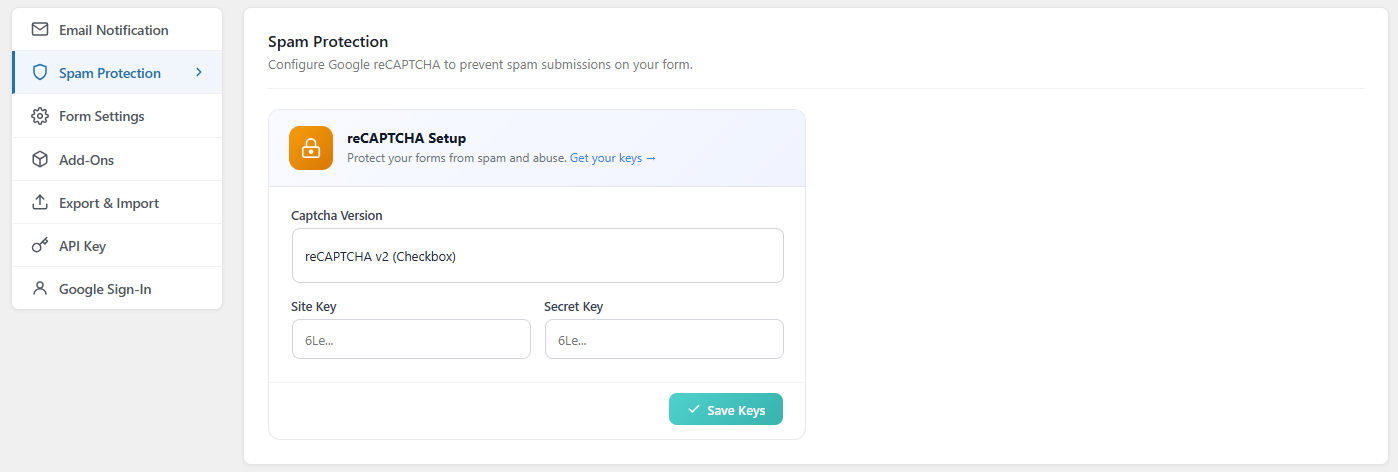
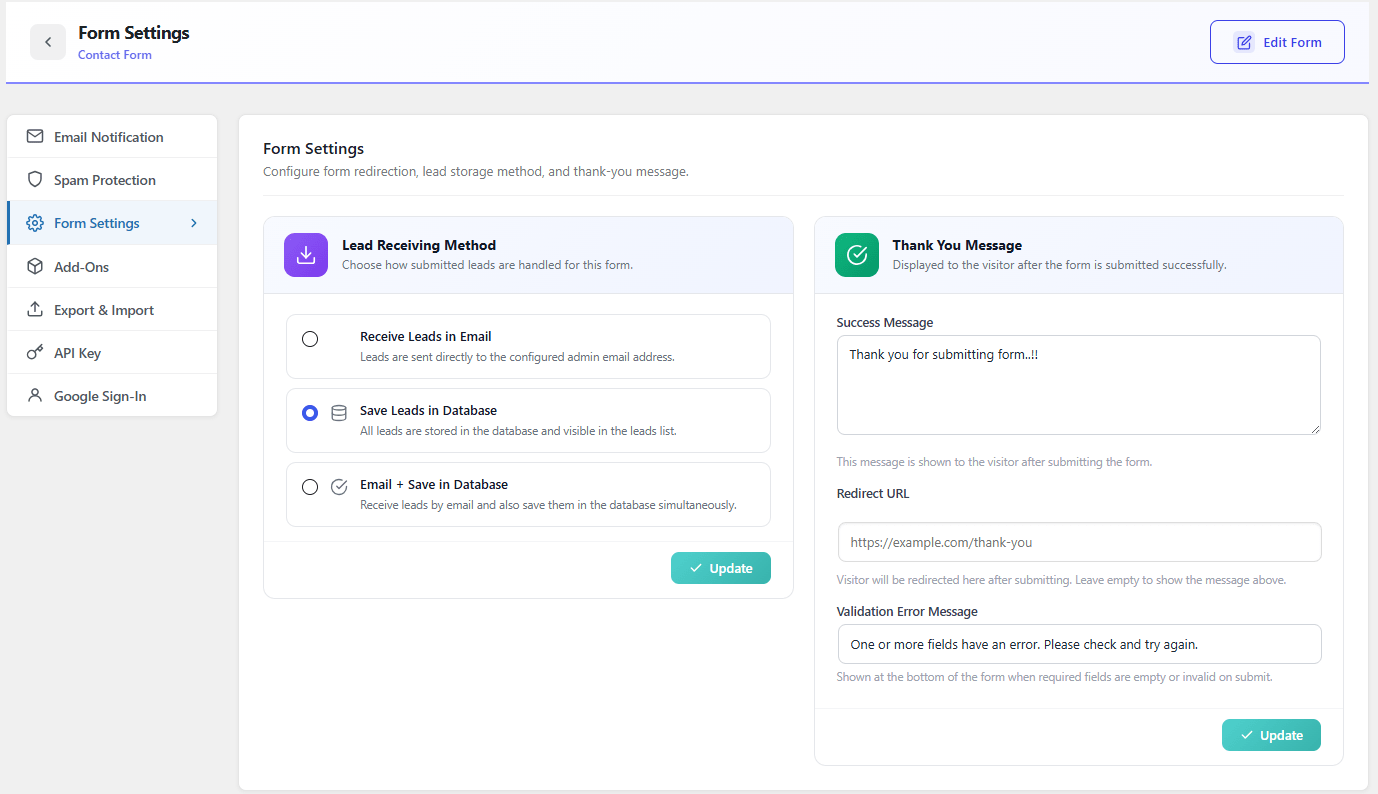
    Save leads in database:- Your all leads will receive and save in your database which can be seen in the database.

    Receive leads in email and save in database:- By using this option leads will receive in your mail and save in your database too.

    Thank You Message

    • For Form Redirection Setting. Go to Dashboard > Lead form > Form list > Setting
    • Write the message you want to send to users after submission of the form.
    • You can redirect your form after submitting. Just paste the URL in the text area and redirect your visitor to the desired page or site.

    Form Addons or Advanced setting :-

    • Go to Dashboard > Lead form > Click On Settings Icon

    Click on Add-Ons

    MailChimp Addon Setting

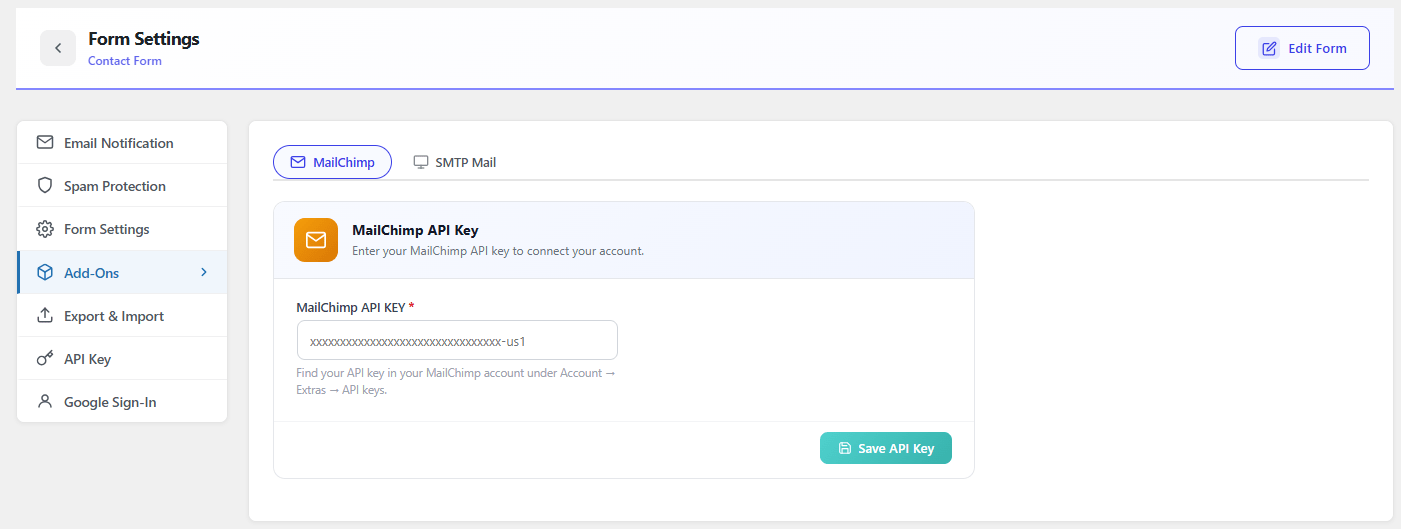
    As MailChimp is a simple email marketing software (EMS) which gives you a number of easy options for designing, sending and saving template of your emails. We are giving you this option in our plugin, you can simply add your MailChimp API KEY and save it.

    SMTP Configure

    • SMTP Name: Enter a recognizable name for your mail service (for example, Gmail).
    • SMTP Server/Host: Enter the host address provided by your mail provider (for example, smtp.gmail.com).
    • SMTP Port: Enter your server’s secure port number (common ports are 587 or 465).
    • Connection Security: Choose your server’s security type by selecting TLS, SSL, or None.
    • SMTP Username: Enter your full email address used to log into your mail server.
    • SMTP Password: Enter your secure account password or an app-specific password.

    Export Form Leads

    • For Export Form Leads Setting. Go to Dashboard > Lead form
    • Click on Setting icon of the form
    • Go to Export & Import
    • Here you can add the starting and ending date of your leads and you can easily export them. You can export unlimited leads and save them.

    Form Export / Import

    Form Export

    • For Form Export Setting. Go to Dashboard > Lead form > Form list
    • Click on Setting icon of the form

    Click on Export & Import and the on Form Export / Import

    • By using this option, you can export your form easily. Just click on the export form, and you can export unlimited forms using this option.

    Form Import

    To Import form Configuration, go to the Form ImportForm Configuration

    • Choose the JSON file and import the form.

    API Key

    Open Form list and click on Settings icon.

    Go to API Key

    You can use the REST API settings to securely send your lead data to external applications or authenticate external submissions.

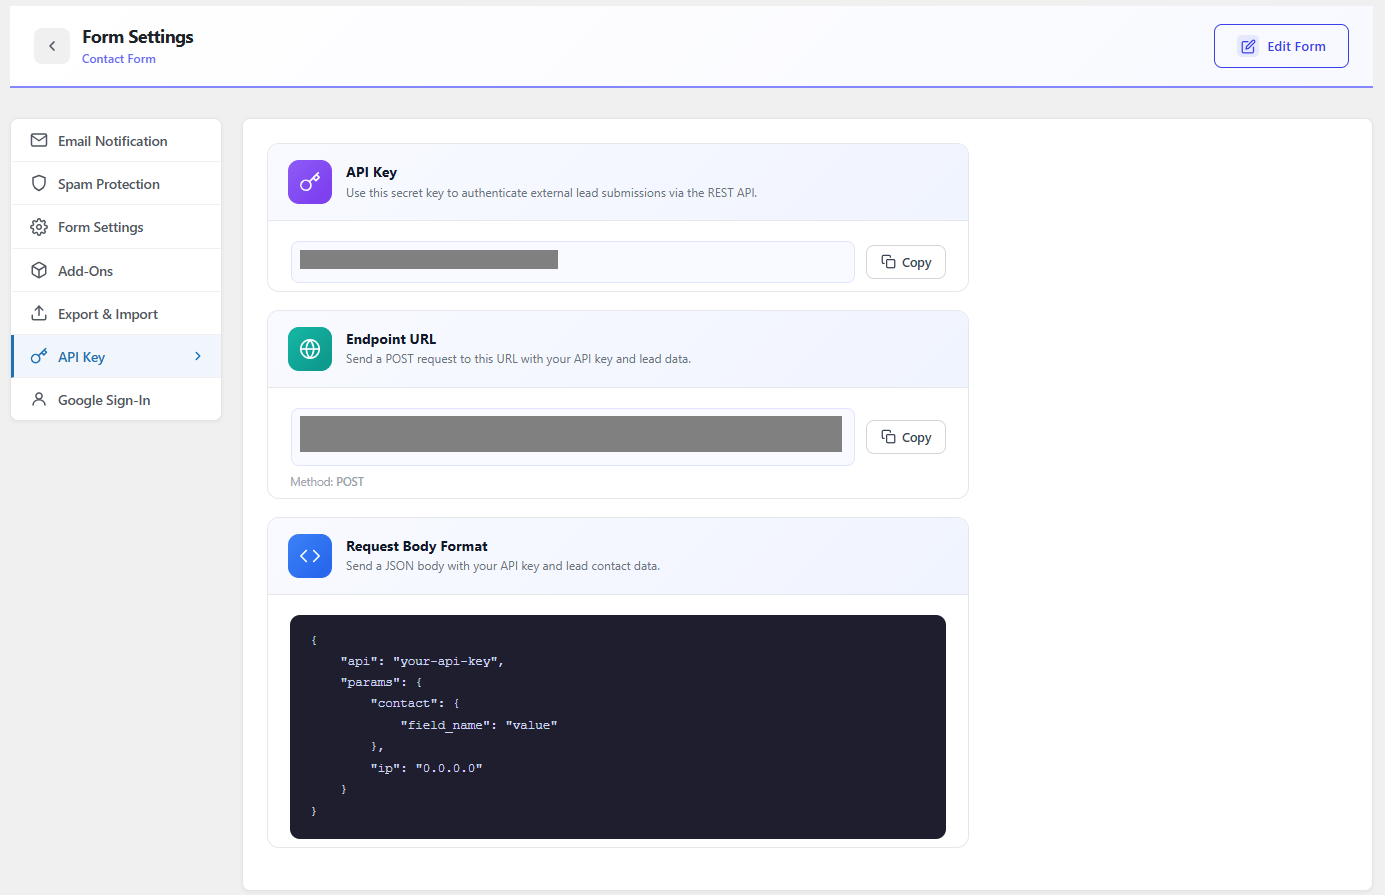
    Copy Your API Credentials

    1. API Key: This secret key authenticates your external lead submissions. Click the Copy button next to the key field to save it to your clipboard.
    2. Endpoint URL: This is the specific web address where you need to send your data. Click the Copy button next to the URL field to use it in your external application.

    Google One Tab Leads

    With Google One Tab Leads You can generate an effective and useful Email list. It helps you to get the Emails of your website visitor. If any user clicks on the Google One Tab Login button, then you will get their details right from your Dashboard.

    Follow the Steps Below

    Navigate to Dashboard > Themehunk > Lead Form Builder Pro. Here you will see all your forms.

    Click on the Settings icon of the form you want to add Google Sign-In to.

    Click on Google Sign-In.

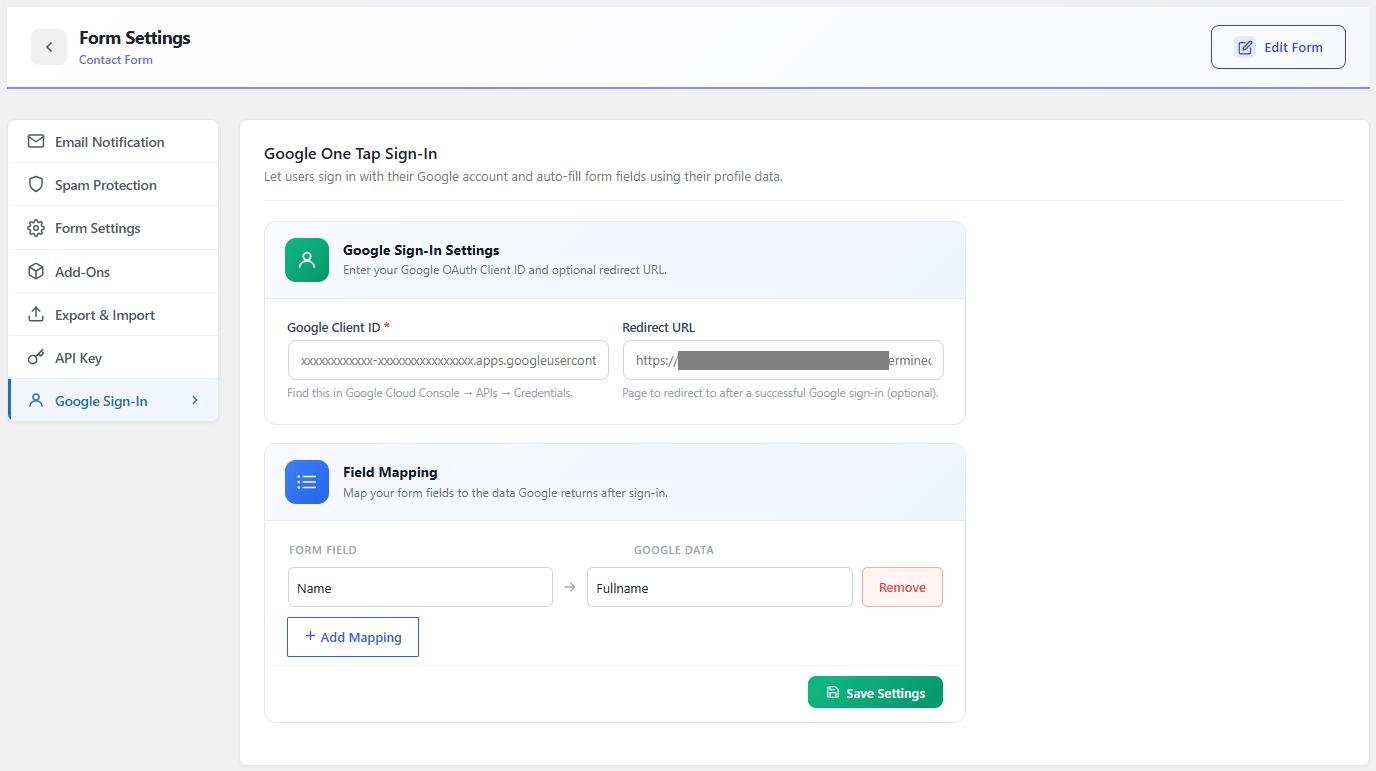
    After this, a page will open with Google Settings. Here you have to set up a few settings like:

    • Google Client ID: Enter your unique Google OAuth Client ID found in your Google Cloud Console under APIs & Credentials.
    • Redirect URL: Enter an optional web address where users will be automatically redirected after completing a successful sign-in.
    • Field Mapping: Match your internal form fields with specific Google account data, like pairing your “Name” field with “Fullname”.
    • Add Mapping: Click this button to link additional form fields with available Google profile data options.
    • Remove: Click this button next to any mapped pair to instantly delete the link between fields.
    • Save Settings: Click this green button at the bottom right corner to activate Google Sign-In for your form.

    After doing all the steps, now click on the Save Settings button.

    After saving the form. Now when any visitor comes to your website, they will see a Google One Tap Login popup on the Top Right Side of the website. As you can see in the screenshot below.

    To Know more about Google One tap login lead generation, and creating Google API, Read This blog for full details.