Offering a buy Buy 1 Get 1 (BOGO) is one of the most effective ways to increase your sales and clear your inventory. You know why it is important for an ecommerce website. Because there are four letters that carry more weight than any percentage sign, those letters are FREE.
Why does it matter? In our world, people naturally perceive a free item as a high-value bonus, whereas a flat discount can sometimes signal lower product quality. For WooCommerce store owners, mastering this promotion is not just about giving items away, it is about strategically engineering higher conversion rates, moving stuck stock, and scaling your e-commerce growth.
Why Does Your Store Need Buy 1 Get 1 Deals?
Running a BOGO campaign offers massive operational and financial advantages over traditional discounting methods.
- Clearing Slow-Moving Stock Effortlessly: Storing unsold inventory ties up capital and eats into warehouse space. BOGO deals allow you to purge older collections or low-demand SKUs quickly by bundling them with faster-moving items.
- Spiking Average Order Value (AOV): Traditional discounts lower your store’s total revenue per cart. BOGO promotions flip this script by convincing customers to add multiple items to their cart to unlock the reward, instantly raising your average order totals.
- Lowering Customer Acquisition Costs (CAC): A compelling BOGO offer acts as an excellent lead magnet. Satisfied shoppers are highly likely to share a “free gift” deal with friends and family, generating free word-of-mouth marketing and lowering your paid ad costs.
- Boosting Long-Term Brand Loyalty: Shoppers remember the brands that gave them extra value. Delivering a bonus product creates a highly positive unboxing experience, paving the way for repeat purchases and higher customer lifetime value.
Popular Types of Woocommerce Buy One Get One Offers
Not all BOGO deals are created equal. Depending on your current inventory goals and profit margins, the add-on interface allows you to configure three distinct variations directly within WooCommerce:
- Buy X, Get X Free (The Classic BOGO): The purest form of BOGO. If a customer buys a specific product, they get an identical second piece completely free or heavily discounted. This is highly effective for consumables, cosmetics, or items people naturally buy in duplicates.
- Buy X, Get Y Free (The Cross-Sell Offer): A tactical format where buying a primary item unlocks a different, complementary item. For example, buying a pair of sunglasses triggers a discount on a protective hard case. This introduces customers to your broader catalog and clears specific reward inventory.
- Dynamic Quantity Tiers (The Bulk-Buy Incentivizer): This format scales your rewards based on volume. Instead of a flat one-for-one deal, it unlocks steeper discounts the more items a shopper adds to their cart (e.g., Buy 2 for 20% off, or buy 5 for a massive $70 off per item). It is the perfect setup for moving large quantities of stock rapidly.
Golden Rules of Running a Successful Buy One Get One Campaign
Throwing a BOGO badge on a product page isn’t always enough to guarantee success. To maximize your return on investment and avoid common e-commerce pitfalls, follow these campaign rules:
- Enforce Strict Expiration Dates: Human beings are hardwired to avoid missing out. Use limited-time scheduling and countdown timers to create genuine urgency, forcing shoppers to act now rather than leaving items abandoned in their cart.
- Flash the Offer Everywhere: Never hide your deal exclusively on the checkout page. Aggressively promote the BOGO offer using global site banners, store pop-ups, and highlighted badges directly on product grid thumbnails.
- Track Margins and Set Safeguards: Do not blindside your business by losing money. Factor in your product cost, shipping expenses, and plugin fees ahead of launch. Set hard boundaries in your WooCommerce settings to prevent users from stacking multiple major discount coupons on top of the BOGO offer.
- Optimize for Mobile Checkouts: A massive portion of your store traffic browses on smartphones. Ensure your BOGO pop-ups, cart notifications, and coupon fields scale cleanly and load quickly across all screen sizes.
How to add
Let’s see how we can add the Buy One Get One feature to your woocommerce website.
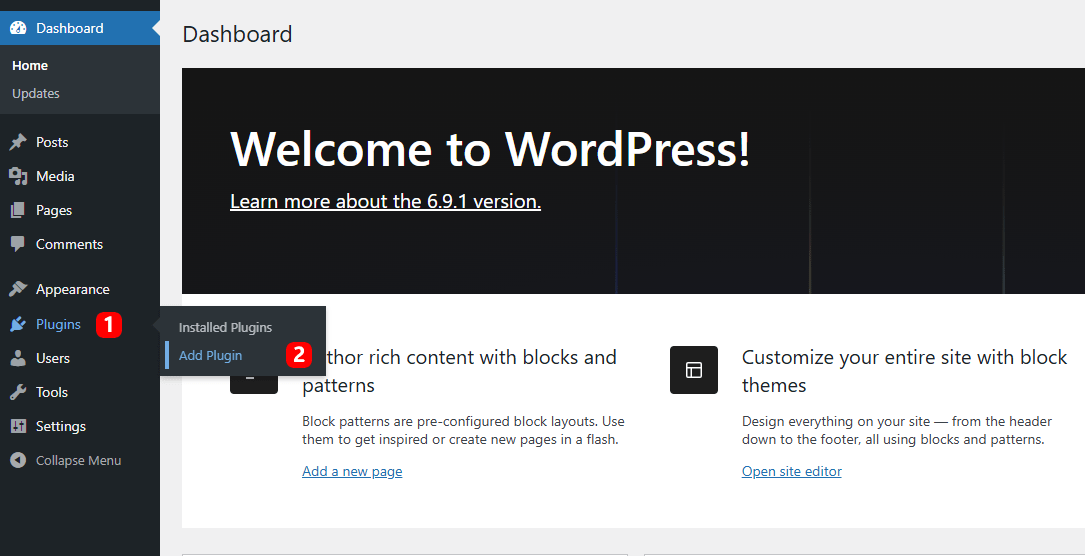
Step 1: Install the Store One plugin on your dashboard.
Open your WordPress dashboard, go to Plugins, and click on Add Plugin
Go to the search bar and search for TH Store One

Install and activate the theme
After activation, it will appear in your dashboard menu

Step 2: Enable the addon
Click on the Smart Offers addon’s Configure button

Toggle on the enable button

Step 3: Configure the addon’s settings
Settings

This will open the settings of the addon, some basic, along with advanced.
Let’s see the methods given to set up BOGO
Method 1
This rule is perfect for simple campaigns where buying a specific item triggers a deal for that exact same item (e.g., Buy a T-shirt, get an identical T-shirt free).

- Select the Rule Type: Navigate to the top panel of your add-on dashboard and click on the Buy X Get X tab.
- Choose Eligible Items: Under the BOGO Setup section, locate the Offer applies to dropdown menu. You can choose to apply this globally to All Products or filter it down to specific products, categories, or tags.
- Refine Exclusions: If you have high-margin items or newly released products that you do not want to give away, toggle the Exclude products switch to “On” and search for the specific items to leave out of the campaign.
Method 2
Use this option when buying one product unlocks a free or discounted different product (e.g., Buy a premium jacket, get a specific T-shirt for free or half price).

- Select the Rule Type: Click on the Buy X Get Y tab at the top of the interface.
- Define What the Customer Buys (X):
- Go to Qualifying products and choose whether this trigger applies to All Products, a specific category, or a tag.
- Set the Quantity to buy. For instance, enter
2if a customer must buy two items to trigger the reward.
- Define What the Customer Gets (Y):
- Under Reward products, change the dropdown to any one of Specific Products, Specific category, Specific Tag, or Same Product.
- Use the Select Product search bar to pick your reward item (e.g., T-Shirt with Logo).
- Set the Reward quantity (how many items they get at a discount).
- Choose the Discount Type: Expand the Discount on Y dropdown menu. You have four powerful choices depending on your budget:
- Free Product: Gives the reward item away for zero dollars.
- Percentage OFF: Grants a custom markdown (like 50% off the second item).
- Fixed OFF and Fixed Price: Knocks a specific dollar amount off or sets a flat price for item Y.
- Set the Discount Basis: Use the final dropdown to choose whether the discount calculates off the item’s original Regular Price or its current Sale Price.
Method 3
If you want to incentivize bulk buying, the Dynamic Offer tab allows you to give bigger discounts the more a customer buys.

- Select the Rule Type: Click on the Dynamic Offer tab.
- Establish the Quantity Tiers: Click the + Add Tier button to build out custom ranges. For example shown in the panel setup:
- Tier 1: Set From Qty 2 to To Qty 3 with an Offer Type of Percent Discount and a Value of
10. - Tier 2: Set From Qty 3 to To Qty 5 with an Offer Type of Price Discount and a Value of
50.
- Tier 1: Set From Qty 2 to To Qty 3 with an Offer Type of Percent Discount and a Value of
- Configure Discount Basis: Just like the previous methods, finalize whether these tier discounts apply to the item’s Regular Price or Sale Price.
Display
This section allows you to manage where your offers show up on your store and how the promotional texts look to your customers.
Instead of forcing you to write static text for every single product, this interface uses smart shortcode placeholders to automatically change the text based on the specific rule you built in the previous step.
The dashboard provides a handy legend of shortcodes you can use:
- {DELPRICE} = Original Price (crossed out)
- {PRICE} = The new Offer Price
- {XQTY} = Required item quantity to buy
- {YQTY} = Reward or maximum quantity given
- {DISCOUNT} = The actual discount value (e.g., 50% or FREE)
- {REMAINING} = Dynamic text showing how many more items a user needs to buy to unlock the deal.

Here is how to fill out the customizable text fields using these blocks:
Dynamic Offer Text Settings
- Offer Title: This is your primary headline. A format like Buy from {XQTY} to {YQTY} items for {DISCOUNT} OFF per item automatically translates on the storefront to an attractive, clear call to action (e.g., “Buy from 2 to 4 items for 10% OFF per item”).
- Badge Text: This sits over the product image or near the title to grab fast attention. Keep it simple and punchy, such as Save {DISCOUNT}.
- Price Text: Clear pricing reduces checkout abandonment. By using Price {DELPRICE} {PRICE}, the plugin will automatically display the old price struck through right next to the attractive new offer price.
- Short Description: A tiny snippet of microcopy directly below the price to reinforce the value proposition. A simple {DISCOUNT} / each item works beautifully here.
Cart & Checkout Page
The right column features a Cart & Checkout Page customization box. The text you enter under fields like Dynamic Discount ensures that when a user views their cart summary or checkout screen, they see a custom label (like “Dynamic Discount applied”) verifying that their BOGO savings have been successfully taken off their grand total.
Style
The final step in creating a professional promotion is making sure it blends seamlessly with your store design. The Style tab gives you full visual control without touching a single line of CSS.

In the Card column, you can customize the container block where your offer sits. It allows you to set eye-catching linear-gradient backgrounds, adjust border styles, and tweak the border-radius (e.g., 16px for a modern, rounded look). You can also increase the padding (14px) to give your text room to breathe, and set a distinct Active Card Background to make the selected offer pop out visually to the user.
On the right side, the Typography and Badge controls ensure perfect brand alignment. You can use precision color pickers to match the headings, body text, strike-through prices, and interactive radio buttons to your store’s primary palette. Finally, you can configure a high-contrast Badge Background and text color pair (like white text #ffffff on a dark background) so your critical “Save” or “BOGO” badges instantly catch a shopper’s attention as they scroll.
Backend Preview
One of the best features of this add-on is the live Preview panel built directly into the admin dashboard. This section acts as your testing ground, rendering a real-time mockup of your promotion based on the rules, text shortcodes, and styling options you just configured.

This Backend Preview simulates the single-card layout directly inside your WordPress dashboard. It lets you instantly verify a preview of your offer.

This Backend Preview simulates the cross-sell layout directly inside your WordPress dashboard. It lets you instantly verify that the gift box icon, custom descriptive text, badges, and dynamic item value cross-outs look flawless before publishing the live campaign to shoppers.

As shown in the dashboard screenshot, the backend preview lets you verify exactly how your quantity tiers, radio buttons, and pricing strings look before pushing the campaign live to actual shoppers. You can instantly confirm that your shortcodes (like {DISCOUNT} and {DELPRICE}) are pulling the correct mathematical values, such as showing the original price cleanly crossed out next to the discounted tier price. This eliminates guesswork, saves you from tedious page-refreshing, and ensures your customer-facing offer is flawless and ready to convert from the exact moment you hit publish.
Frontend Preview
As seen on this live Sunglasses product page, the add-on injects a beautiful, native-looking pricing matrix directly beneath the Add to Cart block. Instead of leaving customers guessing or making them manually calculate bulk savings in their heads, the extension breaks down the quantity tiers cleanly using intuitive radio buttons.
Buy One Get One

this live interface introduces an actionable, single-click checkbox row for shoppers. It operates by capturing the buyer’s attention right before checkout, automatically modifying the cart metrics once engaged.
Buy X Get Y

This cross-sell feature embeds below the Add to Cart button to maximize visibility. It functions by offering an interactive radio button that allows shoppers to instantly select the deal. Once selected, the system calculates the promotion dynamically, showing a crossed-out placeholder price alongside the explicit value of the gift to encourage larger cart totals.
Dynamic Offer

By displaying these choices transparently right at the point of purchase, the plugin transforms a basic checkout interaction into an enticing upselling journey that naturally makes users buy more to unlock the next saving tier.
FAQ
Q. Can users stack other coupon codes on top of this?
Ans. Yes, users can also use coupons after using the Smart Offer add-on’s offers.
Q. Does this slow down my website load speed?
Ans. No, it is built with lightweight and optimized code, so it causes no issues regarding speed and performance.
Q. How does this layout look on a mobile screen?
Ans. It is fully responsive to mobile devices. Your site will look perfect on any device your users use.
Q. Will this plugin conflict with my page builder?
Ans. No, the plugin is tested on major WordPress page builders. It runs smoothly across, so no need to worry about its page builder compatibility.
Q. If a customer changes the quantity box in their cart, does the tier discount update automatically?
Ans. Yes, the Tier automatically updates on the cart page when you change the quantity of the product.
Conclusion
Implementing Bogo or Tiered pricing offer is one of the fastest ways to improve sales and clear out inventory. It also helps you increase your Average Order Value (AOV). By shifting away from flat site-wide discounts and using targeted rules, you protect your brand’s perceived value while keeping your profit margins healthy.
As we explored the configuration and came to successful execution, we didn’t find any complications or issues. By taking full advantage of the automated backend rules, optimizing the visual layout with dynamic shortcodes, and utilizing the real-time store preview, you eliminate all friction for your shoppers.
Don’t wait any longer for the next major holiday to test these strategies out. Pick one slow-moving or high-margin product in your catalog this week, set up a simple tiered promotion using this add-on, and watch your conversion rates scale.
If you find it helpful, you can subscribe to our YouTube Channel, where we also upload great content, and follow us on Facebook and Twitter.
Browse More Articles