In this post I am going to explain you how you can create multilingual site using WPML plugin.
Here we are going to cover these points
A. Downloading and Installing plugin.
B. Activating Plugin.
C. Basic Settings.
D. Translating Posts/Pages.
E. Translating taxonomy.
F. Translating Customize Panel.
A. Downloading And Installing Plugin
Login to your WPML account and go to download section.
Now select and download plugin to your computer, You will get a zip file.
Login to your WordPress Dashboard and go to plugins page, click “Add New” plugin and select downloaded zip file from local computer. And click on “Install Now” button.
i. If you get any issue installing plugin in this way then you can extract zip file to your local computer, it will create a directory ii. Now copy that directory and put it in “wp-content/plugins”
B. Activating Plugin
To activate plugin go to “Plugins > Installed Plugin > WPML Multilingual CMS” and activate it.
C. Basic Settings
As soon as you activate your plugin you have to do some basic settings to start working.
Select your default language and then select other language in which you want to translate your site. Here you can select all the languages at a time or you can select it after when needed.
When all first time settings done don’t forget to register it. By registering you will get regular updates whenever a new version is released.
D. Translating Posts/Pages
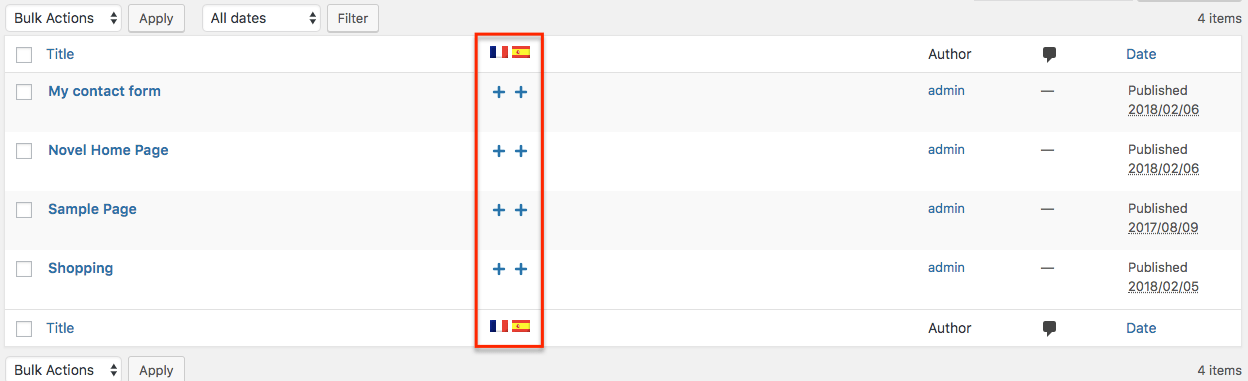
After completing all basic settings, to translate your page/post go to “Pages > All Pages” there you will get “Plus” sign, this will indicate that those pages are not translated and ready to translate.
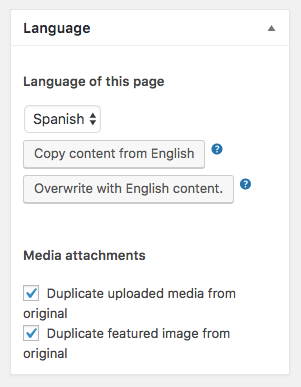
To translate page click on plus sign under particular language (flag). It will open a separate editor, here you have to add content in that language and save all the content.
Here you will get option to duplicate “Media images and featured images” of default content.
It will help to save lots of time. You will get this option in right sidebar.
With same process you can translate posts. There are some more icons which is shown while translating they are explained below.
Plus Sign – This sign indicates that page is not yet translated and ready to translate.
Pencil Sign – This page is translated and you can do further editing if needed.
Double Arrow – Page is already translated but needs updation.
Gear Wheel – Page is already translated but needs updation and other translation is also in progress.
E. Translating Taxonomy
WPML also provides options to translate “Categories” and “Tags”. For that go to “WPML > Taxonomy Translation” in this page you will get option to select your taxonomy for translation.
Suppose if we select category then you will get list of all categories.
Here you will get ‘Plus’ sign for each language to translate as shown in image above. Click on particular sign to translate, it will again open a popup box with original language and another language to translate. Translate all your content and save it. Similarly you can translate same category to other languages.
In the same way you can translate “Tags” also. Translating “Category” and “Tags” Label.
To translate label and slug of category and tag you need to follow same path “WPML > Taxanomy Transaction”. If you select “Tags” then you can see heading “Translation of taxonomy Tag labels and slug”.
Same ‘Plus’ sign will allow you to translate it.
F. Translating Customize Panel
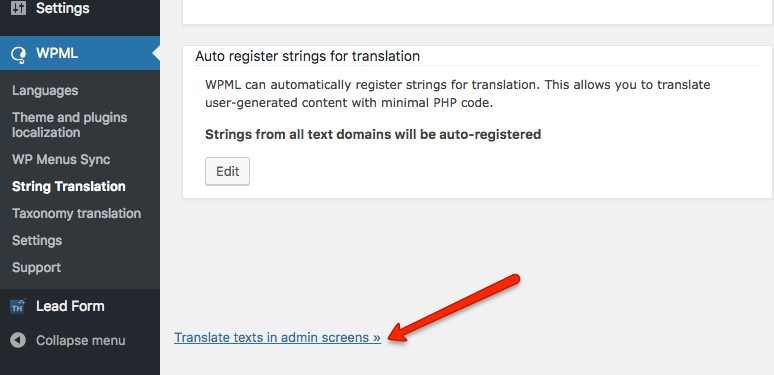
Translating customize panel is little tricky, before that you have to download and activate “WPML String Translation” plugin. You can download it from your WPML members area.
To make customize panel translatable go to “WPML > String Translation” and select “Translate texts in admin screens” available at the bottom of page.
Here you have to activate option of theme, You can get it (For example : theme_mods_themename).
After activating again click “String translation” here you have to select “Select strings within domain” and choose your theme name.
It will show list of all translatable field. All you have to do is, choose your field and click “translation”. It will give option of all the language, just give text in particular language and save it.
Similarly you can translate all the content of customize panel and save it.
In this documentation we have completed almost all points to translate text. If still you have any query then feel free to contact our support forum. Our technical team is always ready to help you.
We use cookies on our website to give you the most relevant experience by remembering your preferences and repeat visits. By clicking “Accept”, you consent to the use of ALL the cookies.
This website uses cookies to improve your experience while you navigate through the website. Out of these, the cookies that are categorized as necessary are stored on your browser as they are essential for the working of basic functionalities of the website. We also use third-party cookies that help us analyze and understand how you use this website. These cookies will be stored in your browser only with your consent. You also have the option to opt-out of these cookies. But opting out of some of these cookies may affect your browsing experience.
Necessary cookies are absolutely essential for the website to function properly. This category only includes cookies that ensures basic functionalities and security features of the website. These cookies do not store any personal information.
Any cookies that may not be particularly necessary for the website to function and is used specifically to collect user personal data via analytics, ads, other embedded contents are termed as non-necessary cookies. It is mandatory to procure user consent prior to running these cookies on your website.


