Plugin Installation
WP Popup Builder is specially designed for adding or creating Beautiful Light-box in your website. It has many Pre-built templates and this popup builder can be customized easily, just follow the below instructions and Design your own popup.
- Step 1: Go to your WordPress Dashboard and navigate to wp-admin > Plugins > Add New. In the Right most side you’ll see the search box, enter the keyword “WP Popup Builder“. Plugin will appear.
- Then click on the ‘Install Now’ button.

- Step 2: After the installation is completed, click on the ‘Activate’ button and “WP Popup Builder” will be activated.

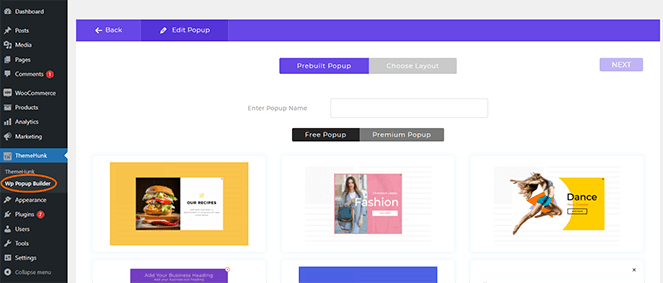
- Step 3: After you have successfully completed Step 2, WP Popup Builder will appear in the WordPress Dashboard. You will be redirected to the Settings page of WP Popup Builder.

Drag & Drop Module
- This setting is available in Real time editor panel. From Drag & Drop Module you can choose Text, Heading, Button, Upload image and also insert Lead form or Contact form in your popup.
- You can drag these elements and drop them in the Popup layout.

1. Text Module
- To add Text in your Popup layout, Drag & Drop Text element from the module into the Popup layout. Place it wherever you want.
- All the Text setting are available. Add the Text content, link and Choose the alignment.
- You can also change the styling of your text content. Adjust the Width, select Container Alignment, Pick background and text color, Font size and Font weight. You can also enable the Border.

2. Heading Module
- To add Heading in your Popup layout, Drag & Drop Heading element from the module into the Popup layout.
- Add the Heading Content, link and choose the alignment.
- You can also change the styling, Adjust the Width, select Container Alignment, Pick background and text color, Font size and Font weight. You can also enable the Border.

4. Image Module
- First Drag and Drop the Image Module in your Popup. Now upload your Image.
- You can also change the styling of your Image. Adjust the Width, select Container Alignment and Enable border.

5. Lead Form Module
- To add Lead Form or Contact form, First install & activate Lead form builder plugin in your dashboard. To know how this plugin works, Follow this Doc.
- You can Customize the “Form”. All settings will be enable after selecting the form.
- You can also change the styling of your Form. Adjust the form Width, select the form Alignment, Pick background color and Enable form border.
- Form Content setting is also available. Individual option is given for each form field. Change the color, font according to your need.

6. Spacer Module
- Using Spacer module, you can space between the other modules. Just drag & drop the module in between and add spacing. You can adjust the Height of your spacer.

7. Shortcode Module
- Drag & Drop the Shortcode module anywhere in your form.
- This module will help you in adding shortcodes in your popup form. Just add your shortcode in the text area and display your form.

Global Setting
- In Global setting panel, you can change or add the Popup builder name. You can Edit the Popup Background Setting like Upload bg image and pick bg color.
- You can also edit the Popup Dimensions like Popup Width, Popup Height Auto/Custom, Popup Padding (in px), Enable Popup Box Shadow and border.

|
FEATURE
|
Free
|
Pro
|
| Real Time Editor |
|
|
| Easily Customizable |
|
|
| Responsive to All devices |
|
|
| Fully Documented |
|
|
| Pre Built Templates |
|
(30+ Templates)
|
| Popup Location |
|
(Home, All Pages, Selected Pages)
|
| Multiple Layouts |
( Three Layouts )
|
( Nine Layouts )
|
| Popup Frequency |
|
|
| Video Popup |
|
|
| Styling Options |
|
( Advanced )
|
| Popup Modules |
|
|
Buy Pro at Affordable Price.
Get Help
If you face any difficulties, feel free to contact our support team at support forum. You can also Contact us. by filling the form or ping us at our Live chat for pre sales queries.


