Overview ➣ This blog explains how to use product categories in WooCommerce. Categories allow you to organize your products so that customers can locate them. You can have main categories and subcategories, such as “Clothing” and “Men.” Categories enhance website navigation and search engine optimization. Proper organization is better for shopping and can boost sales.
Are you finding it difficult to manage your WooCommerce store as your list of products increases?
Are your customers struggling to locate what they need? If so, perhaps it’s time to take a fresh look at product categories.
Understanding WooCommerce Product Categories
Woocommerce Product categories group products into logical sets, making it simpler for customers to shop and for store owners to manage inventory.
Categories may be wide, such as “Clothing,” and may have subcategories such as “Men” or “Women.”
Categories enhance navigation, enhance the shopping experience, and help with SEO by generating keyword-filled pages.
Product categories in WooCommerce serve as hierarchical groupings of similar or related products. For example:
Clothing > Men > T-Shirts
You may add and maintain categories in the WordPress Dashboard in the Product > Categories section where you can enter names, slugs, Parent categories, and images.
A product can be assigned to one or more categories, and it is possible to customize the categorization on your shop page for displaying products, categories, or both.
The proper utilization of categories maintains the store organised and easy to navigate.
Why Display Product Categories in WooCommerce?
Organizing your WooCommerce shop with product categories isn’t necessarily about making it tidy; it’s about building a better customer experience.
Organized categories allow users to easily see what they’re looking for and avoid constantly scrolling.
This not only speeds up the shopping process but can also contribute to more sales.
Well-organised categories also enhance your store’s SEO, making it easier to get discovered on search engines.
And they provide you with the ability to promote seasonal products or sales, which makes your marketing efforts more efficient and effective.
In short, categories organize your store and your customers.
Simple Guide to Organizing and Displaying Your Product Categories:
Step 1: From your WordPress Dashboard, Go to Products > Categories

Log in to your WordPress Dashboard using your credentials, then navigate to Products and click on Categories.
Step 2: Add Main Categories
After clicking on Product > Categories, you will see this page

You can read a detailed description of this page below. This will help you understand what each blank space means.
- Name – A descriptive title for the category (e.g., Electronics, Home Decor).
- Slug – URL-friendly version of the category name. Auto-generated if left blank.
- Parent Category – Leave blank for a main category, or select a parent if it’s a subcategory.
- Description – A summary explaining what the category includes. May appear on the category page.
- Display Type – Controls how the category page looks: • Default – Uses theme layout• Products – Shows only products• Subcategories – Shows only subcategories• Both – Shows both
- Thumbnail – An image representing the category. Helps with visual navigation, especially on the shop page.
Under Add New Category, do the following:
I’m adding a product category to a skincare website. Here, I’m naming the main categories “Skincare”, “Lip care” & “Hair care” The image below is for clarity.

In short, add a name, slug, parent category, description, and an image
- Name: Skin Care
- Leave “Parent category” as “None”
- Click Add New Category
- Repeat for:
- Lip Care
- Hair Care
Step 3: Click Add new category

If you want to add an image, upload it as the thumbnail for the category and click “Add New Category”.
The new “Skin care” category has been successfully created!

How to Display WooCommerce Product Categories in Different Areas of Your Store?
Display Categories in the Navigation Menu
Including categories in your main navigation menu makes it easier for customers to quickly find what they’re looking for.
Step 1: Go to Appearance → Menus

From the WordPress dashboard, navigate to Appearance and click on Menus
Step 2: Go to the Screen Options

To begin, click “Screen Options” in the top right corner, and then select “Product Categories.”
Step 3: Navigate to “Product Categories” And select the “Category”.

Go to Product Categories and choose the items category to display in the menu. And After selecting Hit the “Add to Menu” button.
Step 4: Arrange the Menu Orderly

You can arrange the Menu accordingly by dragging anywhere easily. Once, you arranged it click the “Save menu” button. You can change the order anytime you want.
Here are the categories that have been added to the menu:

Display Categories in the Sidebar
Including categories in the sidebar makes them visible on every page, simplifying shoppers’ navigation.
Sidebars help your customers browse by category while shopping, like when they’re on the shop or product pages. It gives them easy filtering options without needing to go back to the main menu.
Here’s how you can display product categories in your sidebar:
Step 1: Go to the Widgets Area

Go to Appearance → Widgets in the WordPress backend.
Step 2: Navigate to the Shop Page Sidebar.

Scroll down and navigate to “Woocommerce Shop page Sidebar” or “Sidebar”, or the Sidebar name can be varied according to the theme.
Step 3: Add a New block.

In the available widgets list, find Product Categories list.

Step 4: Customize the Widget settings
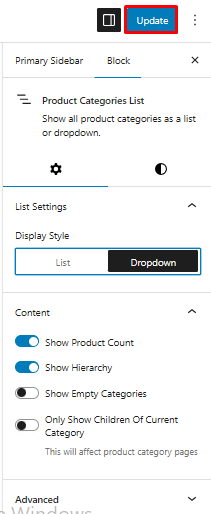
- Show hierarchy: Check this if you want to show subcategories under parent categories (like we set up earlier).
- Show product counts: Optional — shows how many products are in each category.
- Hide empty categories: Optional — hides categories that have no products yet.
Click “Update” in the top right corner after the settings
Display Categories in the Footer
Including categories in the footer makes them accessible on all pages, particularly for users who scroll down.
Step 1: Go to Appearance → Widgets.
Step 2: Drag the Product Categories widget into a footer widget area.

Navigate to the Footer widget area where ever you want to show the categories and then add block, search for Product categories list and click it.
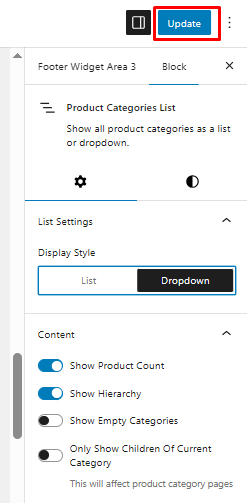
If further settings needed do it and then Click “Save,” and “Update”
This is how your footer will appear

How to delete the uncategorized product category
Step 1: Navigate to Product Categories:

From your WordPress dashboard, go to Products > Categories.
Step 2: Create a New Category (if needed):
If you don’t have a category you’d like to set as default, create one:

Enter a name (e.g., “General”) and slug. Here, I’m adding a new category as “Category”

Click Add new category.

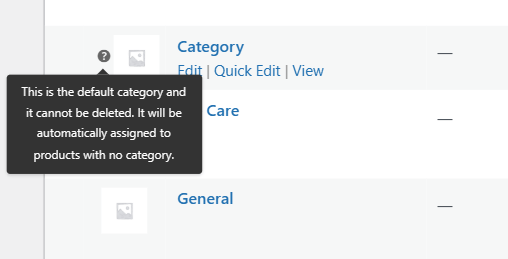
Step 3: Set the New Category as Default:

In the list of categories, hover over the category you want to set as default.

Click on the Make default link that appears beneath the category name.
This action sets the selected category as the default for new products.
Step 4: Delete or Rename “Uncategorized”.
Now that “Uncategorized” is no longer the default, you can:
Delete it by hovering over and clicking Delete.
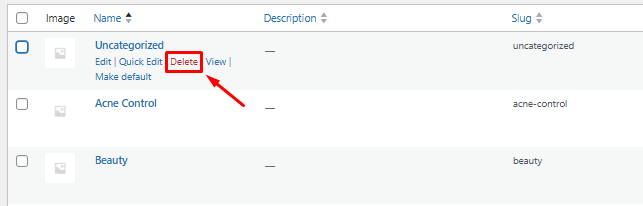
Rename it by clicking Edit, changing the name and slug, then clicking Update.
FAQ
Q: What is the difference between categories and tags in WooCommerce?
Ans: Categories are hierarchical and allow for subcategories.
Tags are non-hierarchical and are better for cross-grouping similar products without nesting.
Q: How can I display categories on my shop page?
Ans: You can configure this via Appearance > Customize > WooCommerce > Product Catalog, then choose “Show categories,” “Show products,” or “Show both.”
Q: Can I customize the category layout or design?
Ans: Yes, you can customize the category layout or design using:
A page builder like Elementor
Custom CSS
WooCommerce-compatible themes
Hooks and filters
Q: How do categories affect SEO?
Ans: Well structured categories enhance site architecture, internal linking, and crawlability, all of which support SEO. Use keyword-rich names, create custom category descriptions, and optimize the category archive pages.
Final words
Displaying Product categories in your WooCommerce store is important for developing a clear, structured shopping experience.
Categorizing products allows customers to easily find what they’re looking for and to browse similar items.
If you find this article helpful, do share it with your friends. If you have any questions regarding this, do not hesitate to comment below. We will help you to solve your problem. Thanks for reading this blog.
We hope this article will help you In Organizing and Display your WooCommerce product Categories.
Please Subscribe to our YouTube Channel, we also upload great content there, and also Do Follow us on Facebook and Twitter
More Helpful Reads: