Overview ➣ Creating an Amazon-like website is more feasible than ever, thanks to affordable tools and platforms. Here’s a streamlined guide to help you build a scalable, multi-vendor e-commerce marketplace without breaking the bank.
Do you want to build a website like Amazon? Or do you want to create an online store website like Amazon? then this article is for you.
It is possible to create a website like Amazon using WordPress, a popular content management system (CMS) that allows you to create and manage a website without requiring advanced coding skills.
Amazon is known for offering a vast selection of products, from books and electronics to clothing and home goods.
When creating a website like Amazon, consider offering a wide range of products to appeal to a diverse audience.
Amazon is the most popular eCommerce Marketplace platform where people sell their products and services online.
To create an Amazon-like website with WordPress, you need to create a WordPress Marketplace website.

Build an Amazon Like Website with WordPress in 6 Steps
Here are the quick steps we’re going to take to create a responsive Amazon Like Website with WordPress.
- Choose Domain
- Host Website
- Setup and Install WordPress
- Select WordPress Theme
- Install Useful Plugins
- SEO & Marketing
Let’s know in detail about creating a website like Amazon using WordPress with these simple steps.
Step 1: Choose the Domain
For creating a website, the first thing you need is a Domain name for your website. First, select and buy a domain name for your website.
A domain is a unique name that identifies a website on the internet. It is used to access a website by typing it into a web browser’s address bar, and it serves as the human-readable address of a website.
For example, the domain for our website, ThemeHunk, is “themehunk.com,” and the domain for Google is “Google.com.”
A domain is made up of two parts: the top-level domain (TLD), which is the extension (such as “.com” or “.in”), and the second-level domain (SLD), which is the name that comes before the TLD (such as “google” or “Wikipedia”).
There are various cheap domain name providers from where you can buy a good domain name for your website.
Below are some of the best and cheap domain name providers you can consider.
| S.No | Domain Registrar | Starting Price |
|---|---|---|
| 1 | Namecheap.com | $0.99 |
| 5 | Name.com | $9.99 |
| 6 | Hostinger | $0.99 |
| 7 | BigRock | $ 1.98 |
Step 2: Host Website
After buying a domain, you need to buy web hosting for a website, where you can host your website.
To host a website, you will need to purchase web hosting services from a web hosting provider.
Web hosting is a service that provides servers that store the files and content for your website, allowing it to be accessed on the internet.
There are various types of web hosting options available, including shared hosting, virtual private server (VPS) hosting, and dedicated hosting.
The type of hosting you choose will depend on the needs of your website, such as the amount of traffic it receives and the resources it requires.
The fastest web hosting for WordPress will help you to boost your website performance.
A good company will deliver better speed and support. The fastest web hosting for WordPress will help you to boost your website performance.
Here are some of the best and fastest web hosting service providers you can consider.
| Hosting | More | Basic Plans | Ratings |
|---|---|---|---|
| Cloudways | Visit | $14.00/mo* | |
| Siteground | Visit | $6.99/mo* | |
| Bluehost | Visit | $3.95/mo* | |
| Kinsta | Visit | $35/mo* | |
| A2 Hosting | Visit | $2.99/mo* | |
| InMotion | Visit | $6.99/mo* | |
| DreamHost | Visit | $2.59/mo* | |
| Godaddy | Visit | $6.99/mo* |
So when choosing a Hosting provider for your website, don’t just go with cheaper hosting plans, but also with good service providers.
If you buy a domain and hosting from the same service provider, you will also get 1-click WordPress to install for your website. We suggest that you get hosting from Cloudways.
Cloudways is a great fit for hosting a WordPress website:
- High Performance & Scalability: Cloudways offers cloud hosting with providers like AWS and Google Cloud, allowing seamless handling of high traffic, especially on match days. Example: Automatically scale resources during match-related traffic spikes.
- Cloudflare CDN: Cloudways integrates with Cloudflare CDN for fast global delivery of static content like images and videos. Example: Match highlights and images load instantly for fans worldwide.
- Cloudways Autonomous: Automated platform management that optimizes performance, security, and scaling without manual intervention. Example: Automatically adjust resources during peak traffic on match days.
- Cloudways Malware Protection Add-on: Provides real-time malware detection and protection to keep your website secure. Example: Protect against malware attacks when posting live match data and updates.
- Cloudways Web Application Firewall (WAF): Shields your site from security threats like DDoS, SQL injection, and XSS attacks. Example: Protect fan data and keep the site running smoothly during high-traffic periods.
- Cloudways Safe Updates: Tests plugin and theme updates in a staging environment to ensure compatibility before going live. Example: Safely update your live score widgets without risking downtime.
- Breeze Plugin: Optimizes caching and reduces load times, crucial for content-heavy sites. Example: Ensure fast loading of match reports and video galleries.
- Auto-healing Servers: Servers automatically recover from issues, minimizing potential downtime. Example: Keep your site running even if unexpected issues arise during live events.
- Managed Security: Includes SSL, automated backups, and DDoS protection for enhanced security. Example: Securely handle fan registrations and sensitive user data.
- 24/7 Support: Expert support is available around the clock, which is crucial during high-traffic matchdays. Example: Immediate assistance in case of any technical issues during important matches.
There are also various free web hosting service providers that you can use to test your website. Unless you want to create a fully functional website with no hurdles, you must buy some good hosting services.
Step 3: Setup and Install WordPress on Your Hosting
We’re going to buy a domain and hosting from Godaddy for creating a website. You can go with any other domain and hosting provider as per your budget and requirements.
Follow the below steps to buy and host the website with GoDaddy.
- Go to Godaddy.com and click on Hosting. From the drop-down menu, you will see an option of Web Hosting. click on that option, as you can see in the screenshot below.

- Now select a Hosting plan. We suggest you buy the Economy plan, which includes a free domain for 12 months. Click on the Add to Cart button as shown in the screenshot below.

- Now click on the Continue button, as shown in the screenshot below.

- Now it’s time to collect your free domain. In the Domain search bar, search for the name, a domain name for your website, as we have searched for blogforthejoy.com, and it’s available.
- If the domain you have searched is available, then you can see a Select and Continue option, as shown in the given screenshot. Click on the Select and Continue button

- Now, it’s time for checkout. After choosing the hosting and domain for your website, you have to check out the available payment methods.

- After the payment, you will get your domain and hosting, and now you are ready to create your first WordPress blog or website.
Install and Setup WordPress
After buying the Domain and hosting for your website, it’s time to install WordPress. To install WordPress on your website, follow the given steps.
- To install WordPress, First Sign in to your Godaddy Account and click on the My Products option, as shown in the screenshot below.

- Now, under the All Products and Services section, you will see an option of Web Hosting. Here, you will see another option of Set Up as shown in the screenshot below. Click on the Set Up button.

- Now, to Set Up your hosting produce, you will need to enter a domain to use with it. On the search bar, enter the domain name that you have purchased along with hosting, and click on the Update button.

- Now you have to choose a data center for your Hosting, as per your location or region you have to select a data center, also GoDaddy will recommend you to choose the closest data center.

- By default, Godaddy will recommend you to use WordPress as your application to build your website. Click on the Yes, let’s do it option.

- Now, you have to set up your WordPress admin account. Choose a Username and Password for your WordPress website. Enter a Username, Password, Confirm the Password, then click on the Next button.

- After that, your WordPress account is set up, and after that, you will see a message, that says “onboarding completed successfully” as you can see in the screenshot below. Now click on the Go to Dashboard button.

- You will be redirected to a new page. Here you will see a Websites option in which you have to click on the Install Application button.

- When you click on Install Application, you will be redirected to your website. just like you can see in the screenshot below.

- Now you have to open the Admin Dashboard of your website. To access the WordPress dashboard, you simply need to add /wp-admin to the end of the URL where you installed WordPress. For example:-
example.com/wp-admin

Replace example.com with Your Domain name as you can see in the screenshot below.

- Now you will see a Login page. Type the username and password you used when you installed WordPress.
- Enter the Username or Email Address and Password, then click on the login Button.

- Now, you will be asked to choose a starter template for your new website.
- If you want to add any template,e then you can add it, or click on the Exit to WordPress Dashboard that you will find on the top left side. as shown in the screenshot below.

- After exiting, you will be redirected to the WordPress Dashboard Admin panel. From here, you can customize your Website and make changes to it.

Once WordPress is set up, you’re ready to customize your WordPress blog’s appearance to make it your own and start blogging, You need to install a good WordPress Theme and some useful Plugins. Let’s know how to do it.
Step 4: Select a WordPress Theme
It’s time to customize your website. Let’s install a beautiful Theme for your website. Follow the given instructions to install a Theme for your website.
You can also install the theme from here: Download Shop Mania
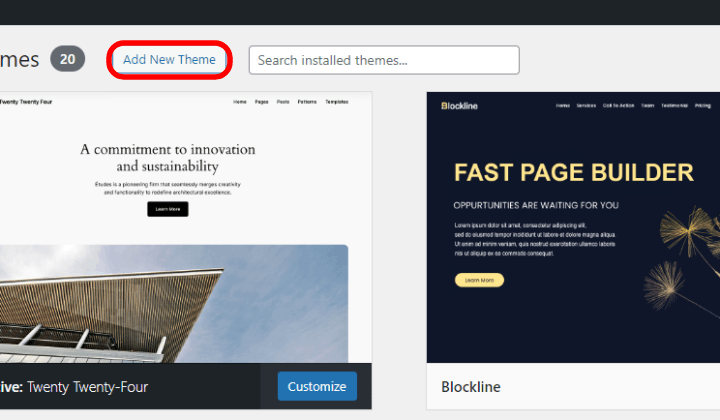
- To install the Theme, go to Dashboard > Appearance > Themes, as you can see in the screenshot below.

- Now, from here, you can install any theme that you like. You can also search for a theme from the search bar.
We suggest you install the TH Shop Mania Theme to create an Amazon-like website shop. Let’s see how it is done.
- Click on Add New Theme in the top right corner
- Go to the Search Bar and search Shop Mania
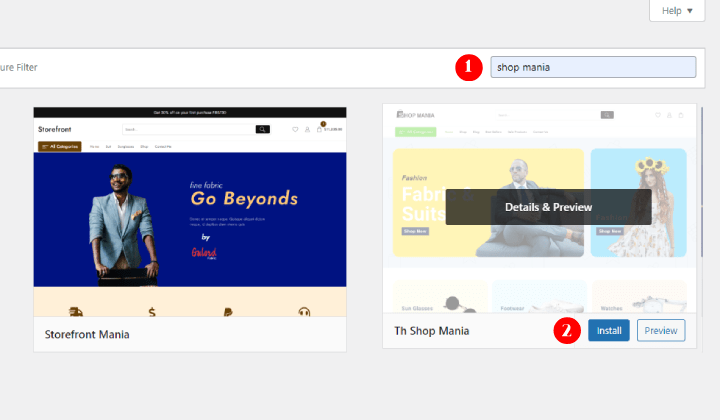
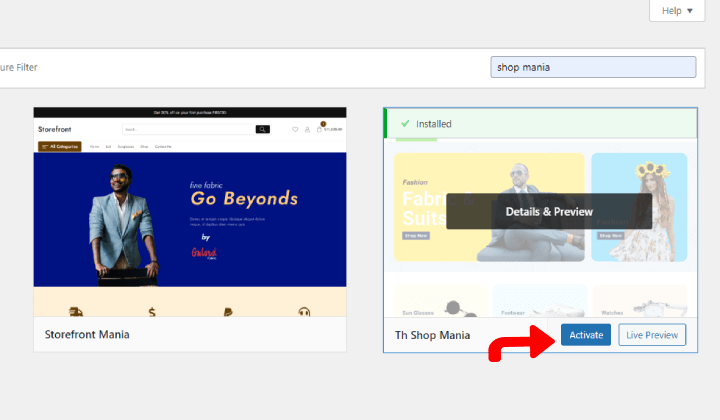
- Click on the Install button. After installation, click on Activate.
- Go to Appearance and click on Shop Mania Options

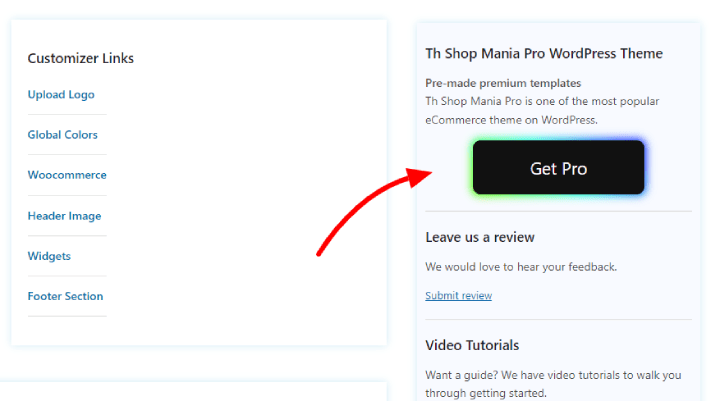
As the theme template is premium, we need to upgrade the theme.
- Click onthe Get Pro button
You will land on the Shop Mania page and scroll down to the pricing.
- Choose your plan and click on Buy Now

- Fill in all the details and click on Next

After all, you will see the member’s area dashboard.
- Click on Shop Mania Pro Plugin and install the plugin

Now, open your dashboard again.
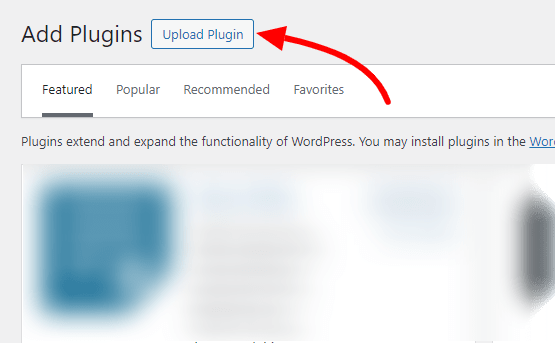
- Go to Plugins and click on Add New Plugin

- Click on Upload Plugin in the top right corner
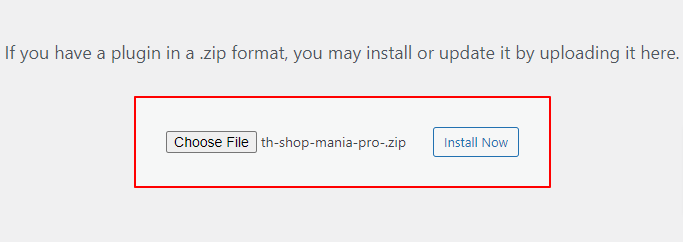
- Upload the Shop Mania Pro plugin here, and click on Install Now
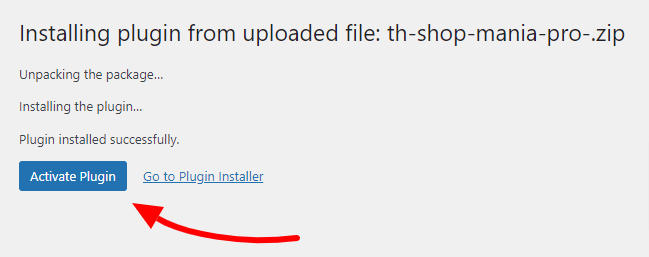
- Click on Activate
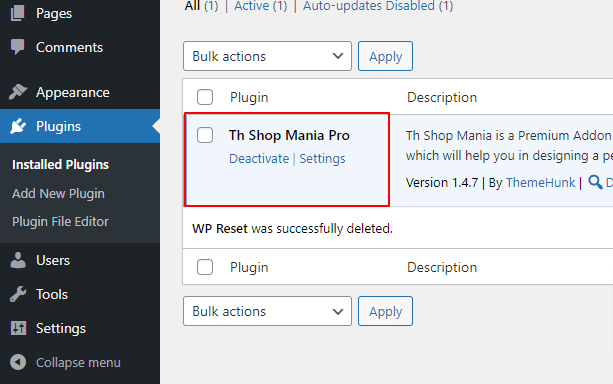
The Shop Mania Pro has come in the installed plugins
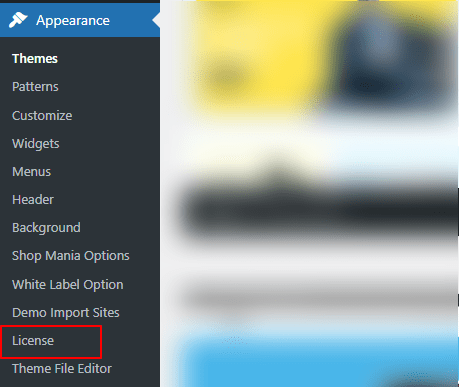
- Go to Appearance and click on License
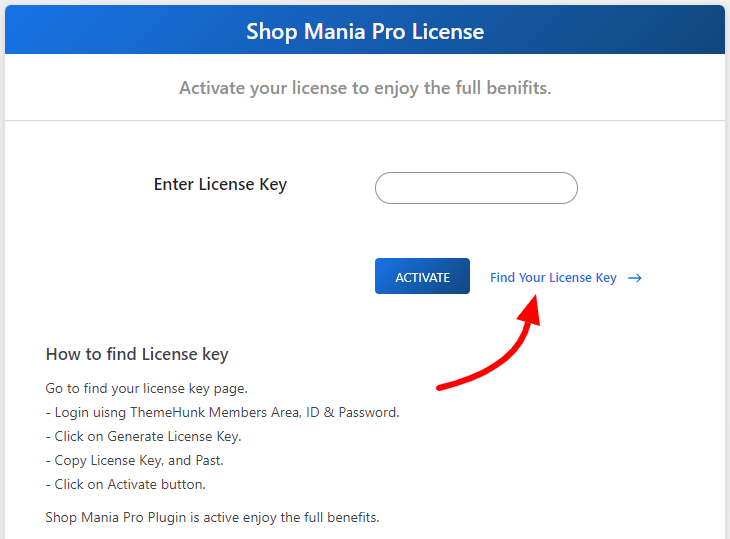
- Click on Find My License Key
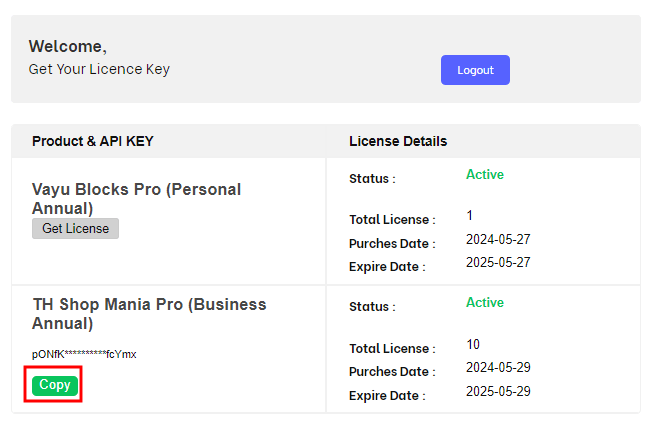
- Log in using the Member’s area ID and password

- Click on Copy to copy the license key
- Paste the License Key into the box and click on Activate

You can also watch the video below to learn more about how to activate the license key of Shop Mania.
- Upon activation, the template page will open as shown below

- Scroll down and search Amaze Mania Multivendor Theme Template

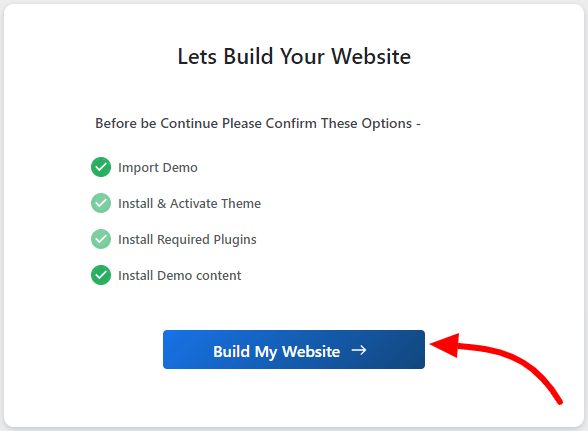
- Click on Continue

- Click on Build My Website
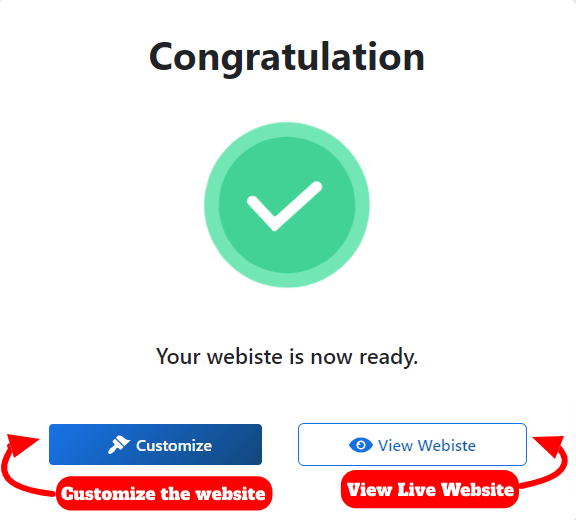
- Click on Customize to Customize the website
- Customize the website with a Page Builder

- The Website is ready

You can also watch the below video to learn more about how to install the Amaze Mania template.
So now we hope you learned about installing and setting up the TH Shop Mania theme for your website.
Step 5: Install Useful Plugins
After the selection of a Theme, we recommend you install some useful plugins to supercharge your website.
- Website Builder– For creating beautiful landing pages so that users can get attention and take action. Ai Website Builder can help you design a beautiful website. (eg. Elementor & Block Editor)
- Analytics– Analytics is a tool that offers an easy and free way to track and analyze visitors to your website. (eg. Sitekit)
- SEO Plugin– Doing SEO may be hard for some website owners. But it can be easy for them with some plugins and tools. (eg. RankMath and Yoast)
- Cache Plugin– If you want to optimize your WordPress website, you can use cache plugins to speed it up.
- Cart Plugin– You can use WordPress shopping cart plugins to add some extra functionality to your WooCommerce Store.
There are various more useful WooCommerce plugins you can install to extend the functionality of your website.
Step 6: SEO & Marketing
After the full setup of the website, you will now need to focus on SEO & Marketing of the website. Not only in SEO marketing but also you have to focus on the quality of your products.
SEO
SEO plays an important role in any new or old website. If you want to get organic traffic from various search engines like Google and Bing. You need to do some SEO work on your website.
In WordPress, you can install SEO plugins to do SEO. There are various SEO plugins you can use. We recommend you use Rank Math or the Yoast plugin for doing SEO on your website.
Local SEO– Your website is not only for online customers but also for offline customers. You need to do some local SEO so that everyone around your store or your city can know about your website.
Marketing
There are various Cheap Email Marketing Service providers from which you can start creating an Email list of your potential customers.
How can you build an effective Email list? So there are various ways of collecting Emails like Free subscriptions, blogging, coupons, etc.
You can use plugins like Lead Form Builder to create an effective email list. This Plugin comes with features like Form export & import, Unlimited lead export, Mailchimp add-on, SMTP mail configuration, and drag-and-drop field ordering.
On the other hand, nowadays, Social Media plays an important role in Affiliate Marketing. Now, with the help of Social Media, you can earn more.
When we talk about social media, there are many social media platforms. But the most famous platforms are YouTube, Instagram, Facebook, and Twitter.
Conclusion
We hope this article helps you to get all the needed information regarding creating a Website like Amazon.
If you have any questions regarding anything, do not hesitate to comment below, and we will help you to solve your problem. Thanks for reading this blog.
Please Subscribe to our YouTube Channel. We also upload great content there. Do follow us on Facebook and Twitter
Read More-
Hello sir website developer